Building Native Image of Spring Boot 3 apps with GraalVM
In this post, we will learn what is native image, how to build native image of Spring Boot 3 application with GraalVM.
In general we deploy spring boot application by building jar file and run those jar file with jvm installed those systems. The Java code written is first compiled into bytecode during the build process and packaged into jar file. The JVM then interprets the generated bytecode for execution.
GraalVM introduced building native executable ( like C++) file for java application which does not require any JVM to run. The executable contains all the application classes, standard-library classes, the language runtime, and statically-linked native code to run the application
Advantages of Native Image
- Uses very minimal resources compared to JVM it is very less expensive to execute
- Application starts in milli seconds
- As all the required libraries and classes packed already, it quickly delivers peak performance
- Can be packaged into a lightweight container image for fast and efficient deployment
- It has a smaller attack surface as it has only required classes , metadata and language runtime
What is Native Image
Native Image is a technology to compile Java code ahead-of-time to a binary – a native executable. A native executable includes only the code required at run time, that is the application classes, standard-library classes, the language runtime, and statically-linked native code from the JDK.
A native executable is created by the GraalVM, processes application classes and other metadata to create a binary for a specific operating system and architecture. First, native image build process , performs static analysis of the code to determine the classes and methods that are reachable when the application runs. Second, it compiles classes, methods, and resources into a binary.
Previously I have written blog post on creating native image of Spring Boot application. At that time native image building was experimental project and possible with only Spring Boot 2.5+ and Java 8 or 11.
With the release of Spring Boot 3.0, the framework comes with in built standard support for generating native images with GraalVM.
Difference between Native and JVM deployments
- At build time, static analysis of your application is performed from the main entry point.
- When the native image is built, any code that cannot be accessible will be deleted and will not be included in the executable.
- GraalVM is unaware of dynamic aspects in your code and must be informed about reflection, resources, serialisation, and dynamic proxies.
- The classpath of the program is set at build time and cannot be changed.
- There is no such thing as lazy class loading; everything packaged in the executables gets loaded into memory upon launch.
- Some elements of Java programmes have constraints that are not completely supported.
Spring AOT (Ahead-of-Time) Processing
What is AOT in spring?
Ahead-Of-Time (AOT) Compilation is the process of compiling high-level Java code into native executable code.
Spring Boot applications are dynamic and configuration is performed at runtime. Spring Boot auto-configuration depends heavily on reacting to the state of the runtime in order to configure things correctly
Following restrictions apply to spring native images
- The classpath is fixed and fully defined at build time
- Your application’s beans cannot be changed during runtime.
- The Spring
@Profileannotation and profile-specific configuration is not supported - Properties that change if a bean is created are not supported (for example,
@ConditionalOnPropertyand.enableproperties).
If your applications obey above restrictions, Spring can perform ahead-of-time processing during build-time and generate additional assets that GraalVM can use.
A Spring AOT processed application will typically generate:
- Java source code
- Bytecode (for dynamic proxies etc)
- GraalVM JSON hint files:
- Resource hints (
resource-config.json) - Reflection hints (
reflect-config.json) - Serialization hints (
serialization-config.json) - Java Proxy Hints (
proxy-config.json) - JNI Hints (
jni-config.json)
- Resource hints (
Now let’s see the step by step process to build the native image.
Required software
- Docker or Podman
- GraalVM 17 ( 22.3 Community or Enterprise Edition)
Setting up the project
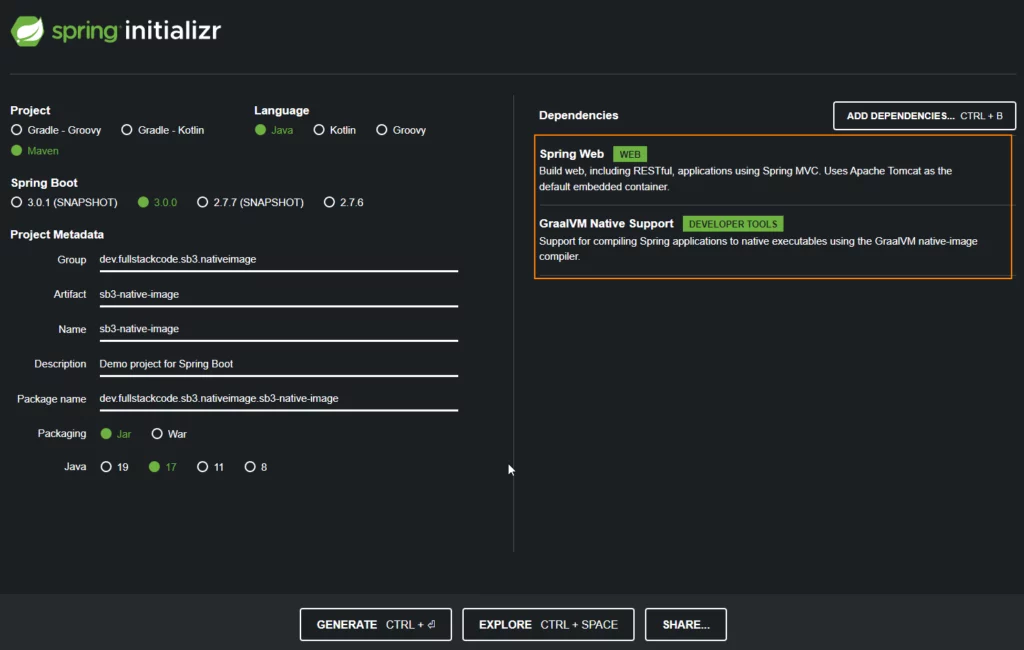
To create a project, go to https://start.spring.io and select following spring version and dependencies.
- Spring Boot 3.0
- spring-boot-starter-web
- GraalVM Native Support
Generate the project, extract and import it into your favorite IDE
Once you import project into the IDE, if you look at the pom.xml it will contain following plugin which will be used while building native executable image.
<plugin>
<groupId>org.graalvm.buildtools</groupId>
<artifactId>native-maven-plugin</artifactId>
</plugin>Code language: Java (java)Let’s develop a simple controller to demonstrate the building of Spring Boot native application.
@RestController
public class WelcomeController {
    @RequestMapping("/hello")
    String home() {
        return "Hello World!";
    }

}Code language: Java (java)
Note
Building native image is highly memory and compute intensive. Try to build the native image on system with at least 16GB RAM.
Make sure that, you are using GraalVm as default JVM with Maven by running below command
mvn --version
Java version: 17.0.5, vendor: GraalVM Community, runtime: /home/harshith/.sdkman/candidates/java/22.3.r17-grl
Default locale: en_IN, platform encoding: UTF-8
OS name: "linux", version: "6.0.14-300.fc37.x86_64", arch: "amd64", family: "unix"Code language: Java (java)
Building Native Image
There are 2 main ways to build a Spring Boot native image
- Using Build Packs
- Using Native Image tools
Using Build Packs
With BuildPacks we can generate light weight docker container native image.
The Docker container with Native application can be built with the following command.
mvn -Pnative spring-boot:build-image
The spring-boot-starter-parent declares a native profile that configures the executions that need to run in order to create a native image. You can activate profiles using the -P flag on the command line.
Note
If are running above command on Apple silicon or ARM64 based systems, you will encounter below error.
exec /cnb/lifecycle/creator: exec format error
To build native image on Apple silicon or ARM64 based systems , you can go through the blog post
You can start the native application container with following command
docker run --rm -p 8080:8080 sb3-native-image:0.0.1-SNAPSHOTCode language: Java (java)
  .   ____          _            __ _ _
 /\\ / ___'_ __ _ _(_)_ __  __ _ \ \ \ \
( ( )\___ | '_ | '_| | '_ \/ _` | \ \ \ \
 \\/  ___)| |_)| | | | | || (_| |  ) ) ) )
  '  |____| .__|_| |_|_| |_\__, | / / / /
 =========|_|==============|___/=/_/_/_/
 :: Spring Boot ::                (v3.0.0)

2022-12-25T07:43:25.697Z  INFO 1 --- [           main] d.f.s.n.Sb3NativeImageApplication        : Starting AOT-processed Sb3NativeImageApplication using Java 17.0.5 with PID 1 (/workspace/dev.fullstackcode.springboot.nativeimage.Sb3NativeImageApplication started by cnb in /workspace)
2022-12-25T07:43:25.697Z  INFO 1 --- [           main] d.f.s.n.Sb3NativeImageApplication        : No active profile set, falling back to 1 default profile: "default"
2022-12-25T07:43:25.705Z  INFO 1 --- [           main] o.s.b.w.embedded.tomcat.TomcatWebServer  : Tomcat initialized with port(s): 8080 (http)
2022-12-25T07:43:25.705Z  INFO 1 --- [           main] o.apache.catalina.core.StandardService   : Starting service [Tomcat]
2022-12-25T07:43:25.705Z  INFO 1 --- [           main] o.apache.catalina.core.StandardEngine    : Starting Servlet engine: [Apache Tomcat/10.1.1]
2022-12-25T07:43:25.708Z  INFO 1 --- [           main] o.a.c.c.C.[Tomcat].[localhost].[/]       : Initializing Spring embedded WebApplicationContext
2022-12-25T07:43:25.708Z  INFO 1 --- [           main] w.s.c.ServletWebServerApplicationContext : Root WebApplicationContext: initialization completed in 11 ms
2022-12-25T07:43:25.718Z  INFO 1 --- [           main] o.s.b.w.embedded.tomcat.TomcatWebServer  : Tomcat started on port(s): 8080 (http) with context path ''
2022-12-25T07:43:25.718Z  INFO 1 --- [           main] d.f.s.n.Sb3NativeImageApplication        : Started Sb3NativeImageApplication in 0.025 seconds (process running for 0.039)Code language: Java (java)
Now you can test the application with rest client.
Using Native Image tools
If you want to generate a native executable directly without using Docker, you can use GraalVM Native Build Tools. Native Build Tools are plugins available from GraalVM for both Maven and Gradle.
To build executable file, we need to install native buildtools and GCC libraries in the system.
Installing GraalVM native image tool
First make sure that, GraalVM bin directory is in the path.
From the command prompt/terminal run following command
gu install native-imageCode language: Java (java)If you are running from PowerShell
gu.cmd install native-imageCode language: Java (java)Installing GCC libraries
Windows
To create Native Image on Windows, we need to install Visual Studio Tools and Microsoft Visual C++
install Visual Studio 2019 community edition with Windows 10 SDK
For detailed instructions, you can refer to the blog post
Linux
Run following command from terminal for Linux OS
sudo apt install build-essential libz-dev zlib1g-devCode language: Java (java)sudo yum install gcc glibc-devel zlib-develCode language: Java (java)sudo dnf install gcc glibc-devel zlib-devel libstdc++-staticCode language: Java (java)Mac OS
Run following command from terminal
xcode-select --installCode language: Java (java)Building the executable image
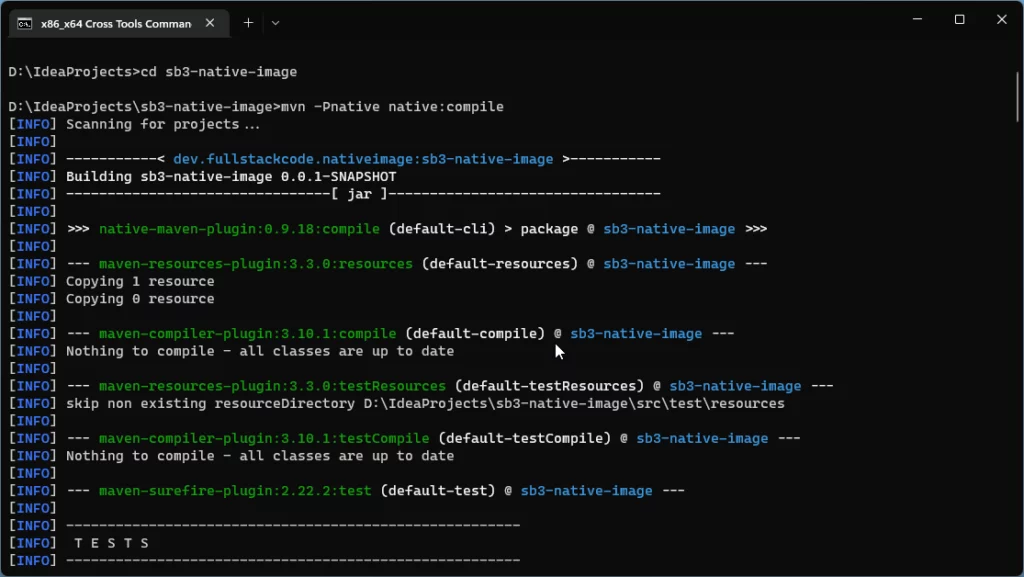
We can invoke the native:compile goal to create native executable file.
We can run following maven command to generate executable file
mvn -Pnative native:compileCode language: Java (java)The above command generates, executable file in the target directory.
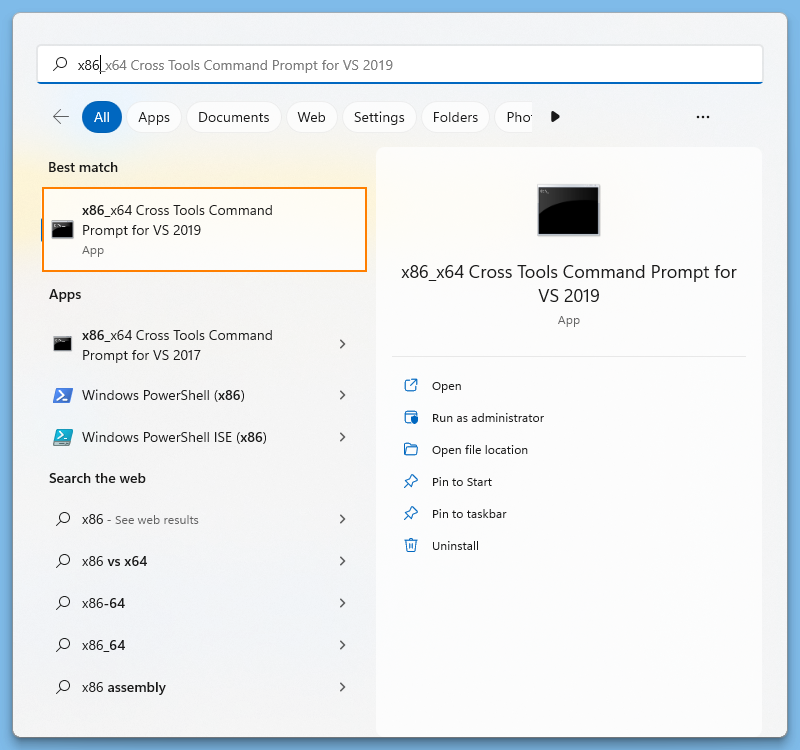
If you are running above command on Windows OS it will fail due to command line maximum length limitation. You have to use x86_x64 Cross Tools Command Prompt for VS 2019 command line instead of the regular Windows command line.
Once executable file is generated, you can start the application by running the following command
Windows
.\target\sb3-native-imageCode language: Java (java)Linux
./target/sb3-native-imageCode language: Java (java) . ____ _ __ _ _
/\\ / ___'_ __ _ _(_)_ __ __ _ \ \ \ \
( ( )\___ | '_ | '_| | '_ \/ _` | \ \ \ \
\\/ ___)| |_)| | | | | || (_| | ) ) ) )
' |____| .__|_| |_|_| |_\__, | / / / /
=========|_|==============|___/=/_/_/_/
:: Spring Boot :: (v3.0.0)
2022-12-23T15:54:30.134+05:30 INFO 9599 --- [ main] d.f.s.n.Sb3NativeImageApplication : Starting AOT-processed Sb3NativeImageApplication using Java 17.0.5 with PID 9599 (/home/harshith/IdeaProjects/sb3-native-image/target/sb3-native-image started by harshith in /home/harshith/IdeaProjects/sb3-native-image)
2022-12-23T15:54:30.134+05:30 INFO 9599 --- [ main] d.f.s.n.Sb3NativeImageApplication : No active profile set, falling back to 1 default profile: "default"
2022-12-23T15:54:30.141+05:30 INFO 9599 --- [ main] o.s.b.w.embedded.tomcat.TomcatWebServer : Tomcat initialized with port(s): 8080 (http)
2022-12-23T15:54:30.141+05:30 INFO 9599 --- [ main] o.apache.catalina.core.StandardService : Starting service [Tomcat]
2022-12-23T15:54:30.141+05:30 INFO 9599 --- [ main] o.apache.catalina.core.StandardEngine : Starting Servlet engine: [Apache Tomcat/10.1.1]
2022-12-23T15:54:30.145+05:30 INFO 9599 --- [ main] o.a.c.c.C.[Tomcat].[localhost].[/] : Initializing Spring embedded WebApplicationContext
2022-12-23T15:54:30.145+05:30 INFO 9599 --- [ main] w.s.c.ServletWebServerApplicationContext : Root WebApplicationContext: initialization completed in 11 ms
2022-12-23T15:54:30.155+05:30 INFO 9599 --- [ main] o.s.b.w.embedded.tomcat.TomcatWebServer : Tomcat started on port(s): 8080 (http) with context path ''
2022-12-23T15:54:30.156+05:30 INFO 9599 --- [ main] d.f.s.n.Sb3NativeImageApplication : Started Sb3NativeImageApplication in 0.03 seconds (process running for 0.033)Code language: Java (java)Now you can test the application with rest client.
Note
mvn -Pnative native:compile command generates platform specific executable file.So executable generated in Windows can not used on Linux or Mac OS and Vice versa
Troubleshooting
fatal error C1083: Cannot open include file: ‘stdio.h’: No such file or directory
Error: Error compiling query code (in C:\Users\deepika\AppData\Local\Temp\SVM-650614115655262187\JNIHeaderDirectives.c). Compiler command ''C:\Program Files (x86)\Microsoft Visual Studio\2019\Community\VC\Tools\MSVC\14.29.30133\
bin\Hostx64\x64\cl.exe' /WX /W4 /wd4201 /wd4244 /wd4245 /wd4800 /wd4804 /wd4214 '-ID:\graalvm-ce-java17-22.3.0\include\win32' '/FeC:\Users\deepika\AppData\Local\Temp\SVM-650614115655262187\JNIHeaderDirectives.exe' 'C:\Users\deep
ika\AppData\Local\Temp\SVM-650614115655262187\JNIHeaderDirectives.c'' output included error: [JNIHeaderDirectives.c, C:\Users\deepika\AppData\Local\Temp\SVM-650614115655262187\JNIHeaderDirectives.c(1): fatal error C1083: Cannot open include file: 'stdio.h': No such file or directory]
Error: Use -H:+ReportExceptionStackTraces to print stacktrace of underlying exceptionCode language: Java (java)
If you are trying to create executable native image on Windows using mvn -Pnative native:compile command on regular window commandline then you will see this error. You need to run this command from the x86_x64 Cross Tools Command Prompt for VS 2019.
Image build request failed with exit status 137
Error: Image build request failed with exit status 137Code language: Java (java)You will see this error, If you are trying to build docker container containing native image with buildpacks using command mvn -Pnative spring-boot:build-image
This error occurs when docker does not have enough memory to build the image. You need to increase the memory and core count allocated to docker.
In my system, I had to increase the docker memory to 8GB to successfully build the native image container.
If you are using WSL2 based on engine in docker desktop on Windows OS ,to increase the memory allocated to docker you need to create .wslconfig file in C:/users/%USERPROFILE% folder and place following content.
[wsl2]
memory=8GB   # Limits VM memory in WSL 2 up to 8GB
processors=4 # Makes the WSL 2 VM use four virtual processorsCode language: Java (java)