Enrich Your Spring Applications by Leveraging Python Functionality with GraalVM
We already know that GraalVM compiles your Java applications ahead of time into standalone binaries that start instantly, provide peak performance with no warmup, and use fewer resources.
GraalVM also supports polyglot programming where you can use multiple language features in single project. Polyglot programming refers to the practice of using multiple programming languages within a single software project. Traditionally, applications were built using a single language, limiting developers in terms of language-specific strengths and capabilities. However, with GraalVM, boundaries between languages dissolve, empowering developers to leverage the strengths of various languages within a unified ecosystem.
What is GraalVM?
GraalVM is an extended JVM that supports multiple languages like Java, Python, JavaScript, Ruby, R and more. It uses the Truffle framework and Graal compiler to achieve high performance across languages.
Some key benefits of GraalVM:
- Run programs written in different languages on the same VM
- Call code between languages with minimal overhead
- Share data seamlessly between languages
- Use language-specific tools and profilers
Note
Building Polyglot Applications
Let’s look at how to build a web application using both Java and Python with GraalVM.
We will implement the backend API in Java using Spring Boot. This gives us access to all the productivity benefits of Spring Framework. Some of the functionality we will implement it Python using libraries like numpy , panda call them from Spring Boot Service classes.
Install GraalVM
First, you’ll need to download and install GraalVM JDK 21 community edition
Install GraalPy
GraalPy is an implementation of the Python language on top of GraalVM. We invoke python functions from Java code we need to install GraalPy. Install GraalPy by following instructions from here
SettingUp Virtual Environment
Once you install Grallpy, The best way of using GraalPy is from a venv virtual environment.
This generates wrapper scripts and makes the implementation usable from a shell as the standard Python interpreter. To create a venv virtual environment with GraalPy, run the following command specifying the path of where you want to create virtual environment.
graalpy -m venv <venv-dir>Code language: Java (java)To activate the environment in your shell session run:
source <venv-dir>/bin/activate
Code language: Java (java)
You can run simple Python commands or programs with the graalpy launcher:
graalpy [options] [-c cmd | filename]Code language: Java (java)For example, start the Python interactive shell from the command line using the command graalpy
Several executables are available in the virtual environment, including python, python3, apart from graalpy.
This virtual environment we going to use while calling python function from Spring Boot applications.
Note
Install Python Packages
If your python program requires additional packages like numpy or pandas, you need to install them into virtual environment created above.
<venv-path>/bin/graalpy -m pip install --no-cache-dir numpyCode language: Java (java)Note
Creating Spring Boot Project
Go to start.spring.io , create a project by selecting web and lombok components and download and import the project into your IDE.
In pom.xml add following dependencies
<dependency>
	<groupId>org.graalvm.polyglot</groupId>
	<artifactId>polyglot</artifactId>
	<version>23.1.0</version>
</dependency>
<dependency>
	<groupId>org.graalvm.polyglot</groupId>
	<artifactId>python-community</artifactId>
	<version>23.1.0</version>
	<scope>runtime</scope>
	<type>pom</type>
</dependency>Code language: Java (java)
Writing Controller Class
@RestController
public class WelcomeController {

    WelcomeService welcomeService;

    public WelcomeController(WelcomeService welcomeService) {
        this.welcomeService = welcomeService;
    }

    @GetMapping("/hello/{name}")
    public String hello(@PathVariable String name) {
        return welcomeService.hello(name);
    }


    @PostMapping("/recommendation")
    public List<Employee> getRecommendation(@RequestBody Project project) {

        return welcomeService.recommendEmployees(project,getAllEmployees());
    }

    private Iterable<Employee> getAllEmployees() {
        List<Employee> emplIst = new ArrayList<>();
        for (int i = 0; i < 10; i++) {
            Employee emp = new Employee();
            System.out.print("Emp Id " + i);
            emp.setId(Long.valueOf(i));
            emp.setName("test" + i);
            List skills = getRandomSkills(4);
            System.out.println(" skills " + skills);
            emp.setSkills(skills);
            emplIst.add(emp);
        }
        return emplIst;

    }

    public static <T> List<T> getRandomSkills(int newSize) {
        List skills = new ArrayList(List.of("C", "C++", "Java", "SQL", "React", "Python", "Data Science", "Vue", "Next JS", "Spring Boot", "AWS", "Azure", "Google Cloud"));     Collections.shuffle(skills);
        return skills.subList(0, newSize);
    }
}Code language: Java (java)
Writing Service Class
We write service class as interface and we implement the methods in Python code.
public interface WelcomeService {

    public  String hello(String name);

    public List<Employee> recommendEmployees(
            Project project,
            Iterable<Employee> employees
    );

}Code language: Java (java)
Creating WelcomeServiceImpl Bean
Next we write a configuration class where we instantiate WelcomeServiceImpl bean based on Python environment and Source code
@Configuration
public class PythonConfiguration {

    ResourceLoader resourceLoader;


    public PythonConfiguration(ResourceLoader resourceLoader) {
        this.resourceLoader = resourceLoader;
    }

    @Bean
    public WelcomeService welcomeService() throws IOException {

        String userHomeDirectory = "/root";

        String venvExePath = resourceLoader.getResource("file:" + userHomeDirectory + "/.local/vfs/venv/bin/graalpy").getURL().toString();

        String sitePath = resourceLoader.getResource("file:" + userHomeDirectory + "/.local/vfs/venv/lib/python3.10/site-packages").getURL().toString();


        Context context = Context.newBuilder("python").
                allowIO(true).
                allowAllAccess(true)
                .option("python.Executable", venvExePath)
                .option("python.PythonPath", sitePath)
                .build();

        Resource resource = resourceLoader.getResource("classpath:/vfs/python/WelcomeServiceImpl.py");

        Source source = Source
                .newBuilder("python", new InputStreamReader(resource.getInputStream()), "WelComeServiceImpl").build();

        context.eval(source);

        Value welcomeServiceImplClass = context.getPolyglotBindings().getMember("WelcomeServiceImpl");
        Value welcomeServiceImpl = welcomeServiceImplClass.newInstance();

        WelcomeService welcomeService = welcomeServiceImpl.as(WelcomeService.class);

        return welcomeService;

    }

}Code language: Java (java)
python.Executable – it is the path to graalpy executable in virtual environment created in above section
python.PythonPath – it is the path where all external packages are installed. All the external pkgs used in your python should be available in this path
/vfs/python/WelcomeServiceImpl.py – is the python source code file where we implement our functionality.
Writing Python Code
in resource folder , create vfs/python/WelcomeServiceImpl.py file and implement hello and recommendEmployees method
import polyglot
import numpy as np
from typing import List
import java

Employee = java.type("dev.fullstackcode.graalvm.python.model.Employee")
Project = java.type("dev.fullstackcode.graalvm.python.model.Project")

class WelcomeServiceImpl:

    def hello(self, txt):
        return  "Hello "+ txt

    def recommendEmployees(self,project: Project, employees: List[Employee]) -> List[Employee]:
            project_vector = np.array(list(map(lambda skill: 1, project.skills())))

            employee_vectors = {
                employee: self.to_vector(employee.getSkills(), project.skills())
                for employee in employees
            }

            distances = {
                employee: np.linalg.norm(project_vector - skill_vector)
                for employee, skill_vector in employee_vectors.items()
            }

            ordered = dict(sorted(distances.items(), key=lambda distance: distance[1]))

            return list(ordered.keys())


    def to_vector(self,employee_skills, searched_skills):
        return np.array(list(map(lambda skill: int(skill in employee_skills), searched_skills)))


polyglot.export_value("WelcomeServiceImpl", WelcomeServiceImpl)Code language: Java (java)
Testing the application
Start the application using with following commands
mvn clean packageCode language: Java (java)java -Dpolyglotimpl.DisableClassPathIsolation=true -jar ./target/springboot-graalvm-python-demo-0.0.1-SNAPSHOT.jarCode language: Java (java)Once application successfully starts, you should be able to test the application with Rest Client
GET – http://localhost:8080/hello/GraalVmPythonExample

POST – http://localhost:8080/recommendation Request-Body:
{
    "skills": [
        "Spring Boot",
        "GraalVM"
    ]
}Code language: Java (java)
Creating Docker File
Since there multiple software installations are involved, it is better to run the application using Docker. You can use below Dockerfile and docker compose file to quickly start and test the application.
FROM ghcr.io/graalvm/jdk-community:21


ARG GRAALVM_VERSION=23.1.1
ARG GRAALVM_AMD_PKG=https://github.com/oracle/graalpython/releases/download/graal-$GRAALVM_VERSION/graalpy-$GRAALVM_VERSION-linux-amd64.tar.gz
ARG GRAALVM_ARM_PKG=https://github.com/oracle/graalpython/releases/download/graal-$GRAALVM_VERSION/graalpy-$GRAALVM_VERSION-linux-aarch64.tar.gz
ARG USER_HOME_DIR="/root"

ENV LANG=en_US.UTF-8 \
    PATH=/opt/graalpy-$GRAALVM_VERSION/bin:$PATH

RUN microdnf install -y curl tar unzip gzip zlib openssl-devel gcc gcc-c++ make  pip patch libtool  glibc-langpack-en libxcrypt-compat wget && rm -rf /var/cache/dnf

RUN uname -m > /tmp/architecture.txt

# conditional installation based on architecture
RUN if [ "$(cat /tmp//architecture.txt)" = "x86_64" ]; then \
       mkdir -p /opt/graalpy-$GRAALVM_VERSION && curl --fail --silent --location --retry 3 $GRAALVM_AMD_PKG | gunzip | tar x -C /opt/graalpy-$GRAALVM_VERSION --strip-components=1; \
    elif [ "$(cat /tmp//architecture.txt)" = "aarch64" ]; then \
       mkdir -p /opt/graalpy-$GRAALVM_VERSION && curl --fail --silent --location --retry 3 $GRAALVM_ARM_PKG | gunzip | tar x -C /opt/graalpy-$GRAALVM_VERSION --strip-components=1; \
    else \
        echo "Architecture not supported"; \
    fi

RUN groupadd  springboot && useradd -g springboot sbuser

RUN graalpy -m venv "$USER_HOME_DIR/.local/vfs/venv"

RUN source "$USER_HOME_DIR/.local/vfs/venv/bin/activate"

COPY requirements.txt .

RUN "$USER_HOME_DIR/.local/vfs/venv/bin/graalpy" -m pip install --no-cache-dir -r requirements.txt

WORKDIR /app

ENV DOCKER_BUILDKIT=1
COPY mvnw mvnw
COPY .mvn .mvn
COPY pom.xml .
COPY src src

RUN chmod +x mvnw

RUN ./mvnw clean test

RUN ./mvnw clean package

ENTRYPOINT ["java", "-Dpolyglotimpl.DisableClassPathIsolation=true", "-jar", "./target/springboot-graalvm-python-demo-0.0.1-SNAPSHOT.jar"]
Code language: Java (java)
Docker Compose File
version: "3.7"
services:
  app:
    build:
      context: ./
      dockerfile: Dockerfile
    ports:
      - "8080:8080"Code language: Java (java)
Now start the application by running docker compose file with following command
docker-compose upCode language: Java (java)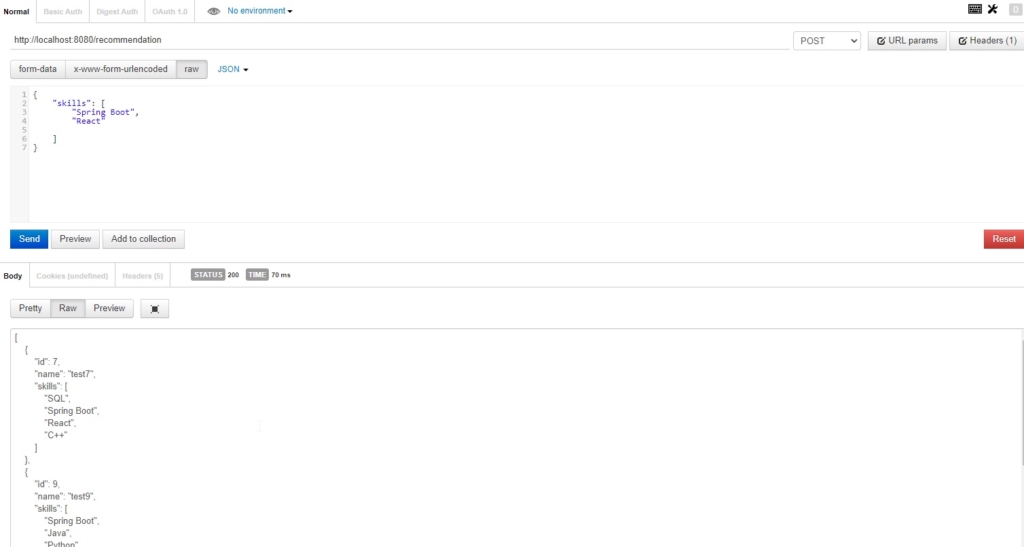
You can download source code for the blog post from GitHub
References