Database Migrations with Liquibase and Spring Boot
In this blog post , I’ll show you how to do database migrations in Spring Boot applications with Liquibase. I’ll show the process of integrating Liquibase, creating migrations, and migrating your database using Liquibase library.
I have already covered about database migrations in detail in one of my previous blog post, in that article I have used Flyway library to do the database migrations.
What is Database Migration ?
Database migration is process of moving schema from one database to other databases in other environments.
Database migration helps us to
- Maintain the version of schema changes to rebuild structure from scratch
- Seamlessly migrates schema from dev to test,pre prod, prod systems
- Developers and DBA admins can be confident about version of schema at any time.
What is Liquibase ?
Liquibase is an open-source database schema change management solution which enables you to manage revisions of your database changes easily.
Liquibase makes it easy for anyone involved in the application release process to:
- Eliminate errors and delays when releasing databases.
- Deploy and roll back changes for specific versions without needing to know what has already been deployed.
- Deploy database and application changes together so they always stay in sync.
In Liquibase terminology, migration files are changelogs.
How Liquibase Works
Liquibase keeps track of migration files using “databasechangelog” table. This table created during first run of migration.
It also creates “databasechangeloglock” file to lock the database so that no other process modifies the database during the migration process.
Liquibase will then begin scanning the filesystem or the application’s classpath for changelog files.
Migration files can be written in following format.
- SQL
- XML
- YML
- JSON
The change sets are then applied based on the sequence mentioned in the file.
“databasechangelog” table is updated whenever each migration is applied
Every time the need to change the database arises, whether structure (DDL) or reference data (DML), simply create a new changeset with a version number higher than the current one. The next time Liquibase starts, it will find it and upgrade the database accordingly
Now let’s see how to perform DB migrations with Liquibase in Spring Boot application
Adding LiquibaseDependency
First step is to add the Liquibase dependency .If you are using Spring Boot’s dependency management feature, you do not need to specify a version number for Liquibase.
<dependency>
<groupId>org.liquibase</groupId>
<artifactId>liquibase-core</artifactId>
</dependency>Code language: Java (java)Creating Changelog file.
First create db/changelog directories inside resource folder.
Create a file called changelog.sql file inside resources/dbmigration/changelog folder.
Specify the changelog file path in the application.properties file as follows:
spring.liquibase.change-log=classpath:<strong>db</strong>/changelog/changelog.sqlCode language: Java (java)Preparing Migration Scripts
As explained earlier migration/changeset scrips can be written in different format. In this blog post we will stick to SQL based migrations. This makes it easy to get started and leverage any existing scripts, tools and skills. It gives you access to the full set of capabilities of your database and eliminates the need to understand any intermediate translation layer.
SQL-based migrations are typically used for
- DDL changes (CREATE/ALTER/DROP statements for TABLES,VIEWS,TRIGGERS,SEQUENCES,…)
- Simple reference data changes (CRUD in reference data tables)
- Simple bulk data changes (CRUD in regular data tables)
First Migration
As we are creating a new database , let’ first create initial database tables.
In changelog sql file, place following text
-- liquibase formatted sql

-- changeset liquibase:1

create sequence hibernate_sequence start with 1 increment by 1;

create table department (id integer not null, name varchar(255), primary key (id));

create table employee (id integer not null, birth_date date, email varchar(255), first_name varchar(255), gender varchar(255), hire_date date, last_name varchar(255), salary numeric(19,2), department_id integer, primary key (id));
Code language: Java (java)
changeset – specifies the migration script
liquibase:1 – specifies the version of migration which will be used by Liquibase to track.
Applying Migrations
To apply migrations in Spring Boot application, you just need to start the application. Spring Boot will then automatically autowire Liquibase with its DataSource and invoke it on startup .Immediately afterwards Liquibase will begin scanning the configured changelog file , if there are updates starts applying them.
Liquibase by default uses primary configured data source from Spring Boot.
You can observe in below startup log , once application starts, it automatically wires Liquibase, acquires lock and applies the SQL and releases lock.
INFO pringbootLiquibaseDbmigrationApplication : Starting SpringbootLiquibaseDbmigrationApplication using Java 18 on DESKTOP-I2JE5RO with PID 2064 (D:\IdeaProjects\springboot-liquibase-dbmigration\target\classes started in D:\IdeaProjects\springboot-liquibase-dbmigration)
INFO pringbootLiquibaseDbmigrationApplication : No active profile set, falling back to 1 default profile: "default"
INFO .s.d.r.c.RepositoryConfigurationDelegate : Bootstrapping Spring Data JPA repositories in DEFAULT mode.
INFO .s.d.r.c.RepositoryConfigurationDelegate : Finished Spring Data repository scanning in 45 ms. Found 2 JPA repository interfaces.
INFO o.s.b.w.embedded.tomcat.TomcatWebServer : Tomcat initialized with port(s): 8080 (http)
INFO o.apache.catalina.core.StandardService : Starting service [Tomcat]
INFO org.apache.catalina.core.StandardEngine : Starting Servlet engine: [Apache Tomcat/9.0.65]
INFO o.a.c.c.C.[Tomcat].[localhost].[/] : Initializing Spring embedded WebApplicationContext
INFO w.s.c.ServletWebServerApplicationContext : Root WebApplicationContext: initialization completed in 2063 ms
INFO com.zaxxer.hikari.HikariDataSource : HikariPool-1 - Starting...
INFO com.zaxxer.hikari.HikariDataSource : HikariPool-1 - Start completed.
INFO liquibase.database : Set default schema name to public
INFO liquibase.lockservice : Successfully acquired change log lock
INFO liquibase.changelog : Creating database history table with name: public.databasechangelog
INFO liquibase.changelog : Reading from public.databasechangelog
Running Changeset: classpath:db/changelog/changelog.sql::1::liquibase
INFO liquibase.changelog : Custom SQL executed
INFO liquibase.changelog : ChangeSet classpath:db/changelog/changelog.sql::1::liquibase ran successfully in 49ms
INFO liquibase.lockservice : Successfully released change log lock
INFO o.hibernate.jpa.internal.util.LogHelper : HHH000204: Processing PersistenceUnitInfo [name: default]
INFO org.hibernate.Version : HHH000412: Hibernate ORM core version 5.6.10.Final
INFO o.hibernate.annotations.common.Version : HCANN000001: Hibernate Commons Annotations {5.1.2.Final}
INFO org.hibernate.dialect.Dialect : HHH000400: Using dialect: org.hibernate.dialect.PostgreSQLDialect
INFO o.h.e.t.j.p.i.JtaPlatformInitiator : HHH000490: Using JtaPlatform implementation: [org.hibernate.engine.transaction.jta.platform.internal.NoJtaPlatform]
INFO j.LocalContainerEntityManagerFactoryBean : Initialized JPA EntityManagerFactory for persistence unit 'default'
WARN JpaBaseConfiguration$JpaWebConfiguration : spring.jpa.open-in-view is enabled by default. Therefore, database queries may be performed during view rendering. Explicitly configure spring.jpa.open-in-view to disable this warning
INFO o.s.b.w.embedded.tomcat.TomcatWebServer : Tomcat started on port(s): 8080 (http) with context path ''
INFO pringbootLiquibaseDbmigrationApplication : Started SpringbootLiquibaseDbmigrationApplication in 6.732 seconds (JVM running for 7.35)
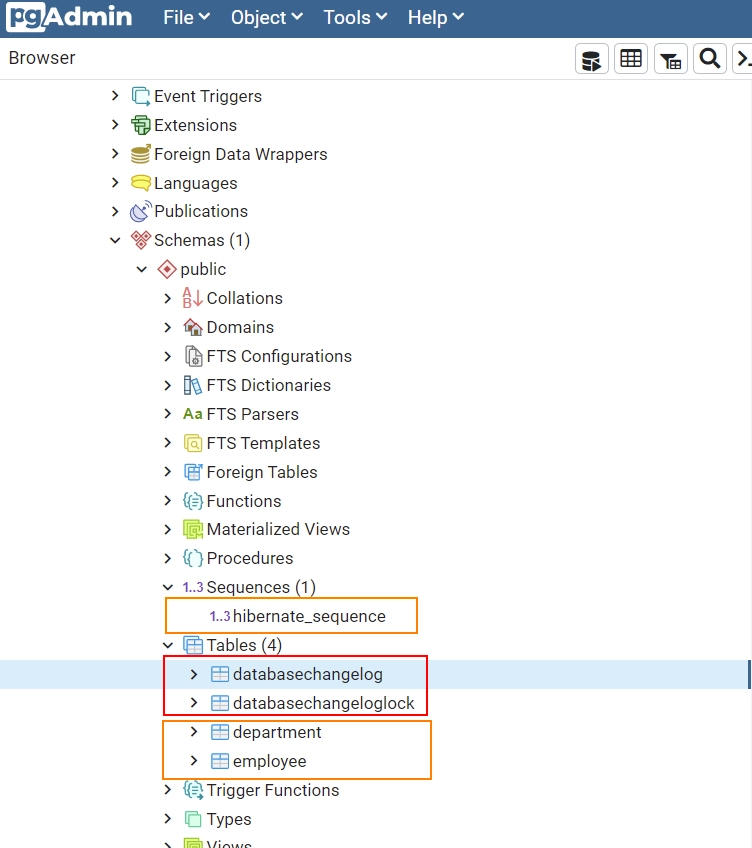
Code language: Java (java)If we take look at the database, you can observe that there are 2 tables related to Liquibase and 2 tables and one schema related to database specified in the changeset.
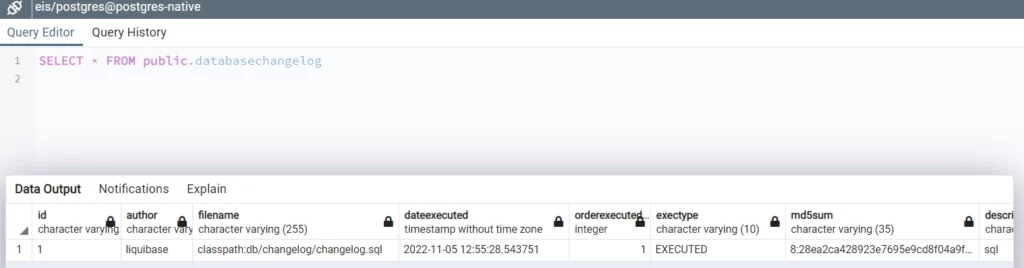
If we take look at the databasechangelog table, it will contain changelog file name, execution order and md5 of changelog
Applying Another Migration
You can keep on applying changesets as per your requirement.
If you want to apply another changeset, you just need to append the script to existing change log file.
-- liquibase formatted sql

-- changeset liquibase:1

create sequence hibernate_sequence start with 1 increment by 1;

create table department (id integer not null, name varchar(255), primary key (id));

create table employee (id integer not null, birth_date date, email varchar(255), first_name varchar(255), gender varchar(255), hire_date date, last_name varchar(255), salary numeric(19,2), department_id integer, primary key (id));

-- changeset liquibase:2
ALTER TABLE EMPLOYEE ADD ADDRESS VARCHAR(255) ;

ALTER TABLE EMPLOYEE  ADD CONSTRAINT FK_EMPLOYEE_DEPARTMENT FOREIGN KEY (DEPARTMENT_ID) REFERENCES DEPARTMENT (ID);

Code language: Java (java)
When you start the application, liquibase will automatically detect the changes and only apply new changes to database. You can confirm this by look at the startuplog and dbchangelog table in database
 INFO  liquibase.database                       : Set default schema name to public
  INFO  liquibase.lockservice                    : Successfully acquired change log lock
  INFO  liquibase.changelog                      : Reading from public.databasechangelog
Running Changeset: classpath:db/changelog/changelog.sql::2::liquibase
  INFO  liquibase.changelog                      : Custom SQL executed
  INFO  liquibase.changelog                      : ChangeSet classpath:db/changelog/changelog.sql::2::liquibase ran successfully in 32ms
  INFO  liquibase.lockservice                    : Successfully released change log lock
  INFO  o.hibernate.jpa.internal.util.LogHelper  : HHH000204: Processing PersistenceUnitInfo [name: default]Code language: Java (java)
Using Separate File for Each Change Set
In above approach we are writing all change sets in single file. This approach could create maintenance issues for large projects over a period of time.
If you want to specify the each changeset in separate file, you can follow below approach
First create changesets in separate .sql files.
Next create changelog.xml file in resources/db/changelog path.
Using <include> tag, mention the change set files. Files are executed based on the written order.
<?xml version="1.0" encoding="UTF-8"?>
<databaseChangeLog
        xmlns="http://www.liquibase.org/xml/ns/dbchangelog"
        xmlns:xsi="http://www.w3.org/2001/XMLSchema-instance"
        xsi:schemaLocation="http://www.liquibase.org/xml/ns/dbchangelog
        https://www.liquibase.org/xml/ns/dbchangelog/dbchangelog-4.9.xsd">

    <include file="./V1__Initail_Schema.sql" relativeToChangelogFile="true" id="1"/>
    <include file="./V2__Add_Address_Emp_Table.sql" relativeToChangelogFile="true" id="2"/>

</databaseChangeLog>Code language: Java (java)
Specify the changelog file path in the application.properties file as follows:
spring.liquibase.change-log=classpath:db/changelog/changelog.xmlCode language: Java (java)2022-11-06 00:23:02.850 INFO 17588 --- [ main] com.zaxxer.hikari.HikariDataSource : HikariPool-1 - Starting...
2022-11-06 00:23:03.174 INFO 17588 --- [ main] com.zaxxer.hikari.HikariDataSource : HikariPool-1 - Start completed.
2022-11-06 00:23:03.431 INFO 17588 --- [ main] liquibase.database : Set default schema name to public
2022-11-06 00:23:03.691 INFO 17588 --- [ main] liquibase.lockservice : Successfully acquired change log lock
2022-11-06 00:23:04.331 INFO 17588 --- [ main] liquibase.changelog : Creating database history table with name: public.databasechangelog
2022-11-06 00:23:04.350 INFO 17588 --- [ main] liquibase.changelog : Reading from public.databasechangelog
Running Changeset: db/changelog/V1__Initail_Schema.sql::raw::includeAll
2022-11-06 00:23:04.546 INFO 17588 --- [ main] liquibase.changelog : Custom SQL executed
2022-11-06 00:23:04.551 INFO 17588 --- [ main] liquibase.changelog : ChangeSet db/changelog/V1__Initail_Schema.sql::raw::includeAll ran successfully in 55ms
Running Changeset: db/changelog/V2__Add_Address_Emp_Table.sql::raw::includeAll
2022-11-06 00:23:04.593 INFO 17588 --- [ main] liquibase.changelog : Custom SQL executed
2022-11-06 00:23:04.600 INFO 17588 --- [ main] liquibase.changelog : ChangeSet db/changelog/V2__Add_Address_Emp_Table.sql::raw::includeAll ran successfully in 10ms
2022-11-06 00:23:04.606 INFO 17588 --- [ main] liquibase.lockservice : Successfully released change log lockCode language: Java (java)Process all changesets from folder
If you feel that adding reference to each sql file to changelog.xml file is laborious process, with some initial planning you can simplify the process.
Instead of manually adding each sql file you write to the XML changelog, arrange all of your SQL into folders and use the <includeAll> element in the changelog to process them all. Because the order in which they are applied is simply alphabetical, you will want to have a well-defined naming strategy for the files while doing this.
<?xml version="1.0" encoding="UTF-8"?>
<databaseChangeLog
        xmlns="http://www.liquibase.org/xml/ns/dbchangelog"
        xmlns:xsi="http://www.w3.org/2001/XMLSchema-instance"
        xsi:schemaLocation="http://www.liquibase.org/xml/ns/dbchangelog
        https://www.liquibase.org/xml/ns/dbchangelog/dbchangelog-4.9.xsd">

    <includeAll path="./changesets" relativeToChangelogFile="true"/>

</databaseChangeLog>Code language: Java (java)
Note
Place your change sets in dedicated folder as liquibase picksup all the files as changeset files.
How to Add Liquibase to Existing Projects
You can also add Liquibase DB migrations to existing database by following below step by step procedure.
Step1 ) Install Liquibase CLI for your operating system from here
Step2 ) Setup connection to your exiting database by specify the driver, class path, URL, and user authentication information in the Liquibase properties file. For more information on setting connection please see the official documentation here
Step3) Generate schema of existing database either manually or using following Liquibase command .
liquibase --changelog-file=changelog.<db_type>.sql generate-changelogCode language: Java (java)The changelog file name extension determines the format of the changelog, so if you specify the file name as changelog.xml, you will get an XML formatted changelog. Likewise, if you specify the file name as .yaml, .json, or .sql, you will get changelogs formatted in YAML, JSON, or SQL, respectively.
If you generate an SQL formatted changelog, specify the type name of the targeted database as a part of the file name
Note
Liquibase does not always detect complex structures like stored procedures or details like an index that is not clustered. Once you have generated a changelog, inspect the output. Review the generated changesets and ensure that the data types look as expected
Step4 ) Once you have your changelog file, you need to create DATABASECHANGELOG table in the database and populate it with our generated changeset and mark it as existing changeset.
following command does the job for us.
liquibase --changelog-file=changelog.<db_type>.sql changelog-sync-sqlCode language: Java (java)Liquibase keeps track of your already deployed changes with the help of its DATABASECHANGELOG tracking table.
Once you sync your existing database with Liquibase migration, you can integrate Liquibase into your spring boot application and perform migration normally.
Configuring different Datasource
Liquibase can be configured to use different DataSource instead of using primary Data Source from Spring Boot application by using below properties.
spring.liquibase.url
spring.liquibase.user
spring.liquibase.passwordCode language: Java (java)
Spring-Liquibase Properties
You can customize the execution of Liquibase in Spring Boot using properties.
Some of the properties I mentioned below. For full list of properties ,please visit the Spring Boot documentation
| Property | Description | Default Value |
| spring.liquibase.change-log | Change log configuration path. | classpath:/db/changelog/db.changelog-master.yaml |
| spring.liquibase.clear-checksums | Whether to clear all checksums in the current changelog, so they will be recalculated upon the next update. | false |
| spring.liquibase.contexts | Comma-separated list of runtime contexts to use. | |
| spring.liquibase.database-change-log-lock-table | Name of table to use for tracking concurrent Liquibase usage. | DATABASECHANGELOGLOCK |
| spring.liquibase.database-change-log-table | Name of table to use for tracking change history. | DATABASECHANGELOG |
| spring.liquibase.default-schema | Default database schema. | |
| spring.liquibase.driver-class-name | Fully qualified name of the JDBC driver. Auto-detected based on the URL by default. | |
| spring.liquibase.drop-first | Whether to first drop the database schema. | false |
| spring.liquibase.enabled | Whether to enable Liquibase support. | true |
| spring.liquibase.labels | Comma-separated list of runtime labels to use. | |
| spring.liquibase.liquibase-schema | Schema to use for Liquibase objects. | |
| spring.liquibase.liquibase-tablespace | Tablespace to use for Liquibase objects. | |
| spring.liquibase.parameters.* | Change log parameters. | |
| spring.liquibase.password | Login password of the database to migrate. | |
| spring.liquibase.rollback-file | File to which rollback SQL is written when an update is performed. | |
| spring.liquibase.tag | Tag name to use when applying database changes. Can also be used with “rollbackFile” to generate a rollback script for all existing changes associated with that tag. | |
| spring.liquibase.test-rollback-on-update | Whether rollback should be tested before update is performed. | false |
| spring.liquibase.url | JDBC URL of the database to migrate. If not set, the primary configured data source is used. | |
| spring.liquibase.user | Login user of the database to migrate. |
You can download the code for the blog post from GitHub