Spring Boot RabbitMQ Direct Exchange Example
In this tutorial, we’ll go through the step by step guide to implement messaging using RabbitMQ in a Spring Boot Application and will see how to publish and consume messages in a queue using RabbitMQ.
What is a RabbitMQ?
RabbitMQ is an enterprise-grade messaging platform that is used to send and receive messages at a scale and reliability that is impossible with traditional messaging platforms.. It can be used to manage large volumes of messages between applications, or for distributing work across multiple processors.
It also includes built-in support for queue clustering and high availability, making it a great fit for building microservice-based systems.
In this tutorial, we’ll examine how to integrate RabbitMQ with Spring Boot applications to send and receive messages. We’ll also explore how to use RabbitMQ features such as queues, exchanges, and bindings to customize messaging behavior.
After reading this article, you should have a good understanding of how to use RabbitMQ with Spring Boot and be able to apply these techniques in your own projects.
When the producer publishes messages to RabbitMQ server , they are not published directly to a queue, instead first they goes to exchange. An exchange is in charge of routing messages to different queues using bindings and routing keys. A binding connects a queue and an exchange.
As explained my previous blog post , There are 5 different types of exchanges in RabbitMQ.
There are 5 types of exchanges
1.Direct Exchange
2.Topic Exchange
3.Fanout Exchange
4.Headers Exchange
5.Default Exchange
In this blog post I will show you how to use Direct Exchange in Spring Boot applications.
This is the first post in this series, In coming weeks I will cover examples for each exchange type.
Second part covers about Topic Exchange
Third part covers about Fanout Exchange
Direct Exchange Example
When using direct exchange, message is routed to the queues whose binding key exactly matches the routing key of the message.
The routing key is a message attribute added to the message header by the producer. Routing key is like an “address” that the exchange is using to decide how to route the message. A message goes to the queue(s) with the binding key that exactly matches the routing key of the message.
The direct exchange type is useful to distinguish messages published to the same exchange using a simple string identifier.

In above diagram, a message with routing key Event_A is sent to the exchange Queue A. The messages with routing key Event_B is routed to QUEUE B because the routing key (EVENT_B) matches the binding key.
If the message routing key does not match any binding key, the message is discarded
Let’s see how to setup the Direct exchange ,queues and bindings programmatically in Spring Boot application.
We create a configuration class to create exchange ,queues and bindings
Setting Up Project
Go to Spring Initializr and add the following starter dependencies to a project.
- Spring Web
- Spring for RabbitMQ
- Lombok (Optional)

Change the Name to “springboot-rabbitmq-producer” and then click on “Generate” button. A .zip will download. Unzip it. Inside you’ll find a simple, Maven-based project including a pom.xml build file (NOTE: You can use Gradle. The examples in this tutorial will be Maven-based.)
Import the project to your favorite IDE.
If want to use RabbitMQ in existing project, you can add ‘spring-boot-starter-amqp’, ‘spring-rabbit-test’ dependencies in your pom.xml like below
<?xml version="1.0" encoding="UTF-8"?>
<project xmlns="http://maven.apache.org/POM/4.0.0" xmlns:xsi="http://www.w3.org/2001/XMLSchema-instance"
xsi:schemaLocation="http://maven.apache.org/POM/4.0.0 https://maven.apache.org/xsd/maven-4.0.0.xsd">
.....
<dependencies>
<dependency>
<groupId>org.springframework.boot</groupId>
<artifactId>spring-boot-starter-amqpp</artifactId>
</dependency>
<dependency>
<groupId>org.springframework.amqp</groupId>
<artifactId>spring-rabbit-test</artifactId>
<scope>test</scope>
</dependency>
</dependencies>
.....
</project>
Code language: Java (java)Configuring RabbitMQ connection
To integrate RabbitMQ in your Spring-powered web applications, first you need to do is configure Spring to use RabbitMQ. Spring for RabbitMQ provides a convenient class called RabbitTemplate to send and receive messages
By default RabbitTemplate class uses following configuration to connect to RabbitMQ instance.
host: localhost
port: 5672 (non -SSL) 5671 (SSL)
username: guest
password: guest
Using application.properties
You can also configure connection to RabbitMQ instance using application.properties.
In real world application you need configure using application properties only.
spring.rabbitmq.host=localhost
spring.rabbitmq.port=5672 (non-SSL) or 5671 (SSL)
spring.rabbitmq.username=guest
spring.rabbitmq.password=guestCode language: plaintext (plaintext)
package dev.fullstackcode.sb.rabbitmq.producer.config;
import org.springframework.amqp.core.Binding;
import org.springframework.amqp.core.BindingBuilder;
import org.springframework.amqp.core.DirectExchange;
import org.springframework.amqp.core.Queue;
import org.springframework.amqp.rabbit.connection.ConnectionFactory;
import org.springframework.amqp.rabbit.core.RabbitTemplate;
import org.springframework.amqp.support.converter.Jackson2JsonMessageConverter;
import org.springframework.amqp.support.converter.MessageConverter;
import org.springframework.boot.ApplicationRunner;
import org.springframework.context.annotation.Bean;
import org.springframework.context.annotation.Configuration;
@Configuration
public class RabbitMQConfiguration {
@Bean
Queue queueA() {
return new Queue("queue.A", false);
}
@Bean
Queue queueB() {
return new Queue("queue.B", false);
}
@Bean
DirectExchange exchange() {
return new DirectExchange("exchange.direct");
}
@Bean
Binding bindingA(Queue queueA, DirectExchange exchange) {
return BindingBuilder.bind(queueA).to(exchange).with("event_A");
}
@Bean
Binding bindingB(Queue queueB, DirectExchange exchange) {
return BindingBuilder.bind(queueB).to(exchange).with("event_B");
}
@Bean
ApplicationRunner runner(ConnectionFactory cf) {
return args -> cf.createConnection().close();
}
@Bean
MessageConverter messageConverter() {
return new Jackson2JsonMessageConverter();
}
@Bean
RabbitTemplate rabbitTemplate(ConnectionFactory connectionFactory) {
RabbitTemplate rabbitTemplate = new RabbitTemplate(connectionFactory);
rabbitTemplate.setMessageConverter(messageConverter());
return rabbitTemplate;
}
}
Code language: Java (java)Queue – beans are used to create queue
DirectExchange – beans are used to create Direct exchange
Binding – beans are used to create bindings between exchange and Queue.
MessageConverter – is used to convert object to Json format
RabbitTemplate – is used to configure the RabbitTemplate.
Note
By default RabbitTemplate uses SimpleMessageConverter class. SimpleMessageConverter class can be used to send data in string and byte format. You can also use SimpleMessageConverter to send json data but using Jackson2JsonMessageConverter class simplifies the work
Creating Exchange and Queues on Startup
Spring Boot application connects to RabbitMQ server instance and creates Exchange and Queues when first message is published . If you want your application to create Exchange and Queues on application startup , you should use following method.
 @Bean
    ApplicationRunner runner(ConnectionFactory cf) {
        return args -> cf.createConnection().close();
    }Code language: Java (java)
Publishing Messages
Once RabbitTemplate is configured , it is very easy publish messages. We can use overloaded send/convertAndSend method on RabbitTemplate to publish messages.
Let’s develop a controller class which publishes messages.
import org.springframework.http.HttpStatus;
import org.springframework.web.bind.annotation.PostMapping;
import org.springframework.web.bind.annotation.RequestBody;
import org.springframework.web.bind.annotation.RequestMapping;
import org.springframework.web.bind.annotation.RestController;
import org.springframework.web.server.ResponseStatusException;

@RestController
@RequestMapping(value ="rabbitmq/event")
public class RabbitMQProducerController {

    @Autowired
    private RabbitTemplate rabbitTemplate;

    @Autowired
    private DirectExchange directExchange;


    @PostMapping
    public String  send(@RequestBody Event event){
        if( event.getName().equalsIgnoreCase("Event A")) {
            rabbitTemplate.convertAndSend(directExchange.getName(), "event_A", event);
        } else if (event.getName().equalsIgnoreCase("Event B")) {
            rabbitTemplate.convertAndSend(directExchange.getName(), "event_B", event);
        } else {
            throw new ResponseStatusException(HttpStatus.BAD_REQUEST,"unknown event");
        }
        return "message sent successfully";
    }

}
Code language: Java (java)
Starting the RabbitMQ
Let’s use following docker compose file for starting RabbitMQ server in local development for our testing.
version: '3'
services:
  rabbitmq:
    container_name: rabbitmq
    hostname: my-rabbitmq
    image: rabbitmq:3.10.6-management-alpine
    ports:
      - '5672:5672'
      - '15672:15672'
Code language: Java (java)
docker-compose upCode language: plaintext (plaintext)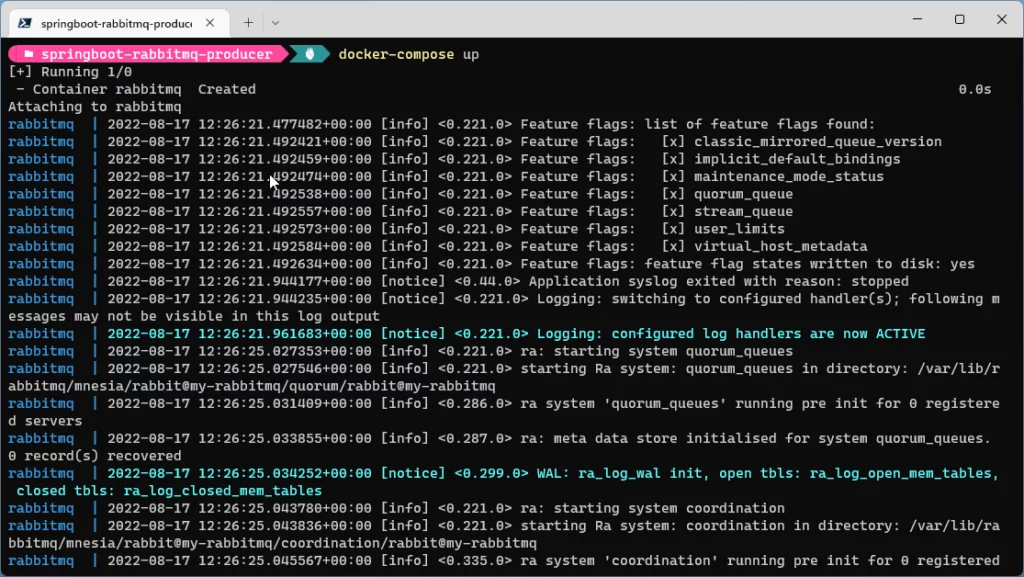
Starting Spring Boot RabbitMQ producer Application
Let’s start the springboot-rabbitmq-producer application and publish some messages.
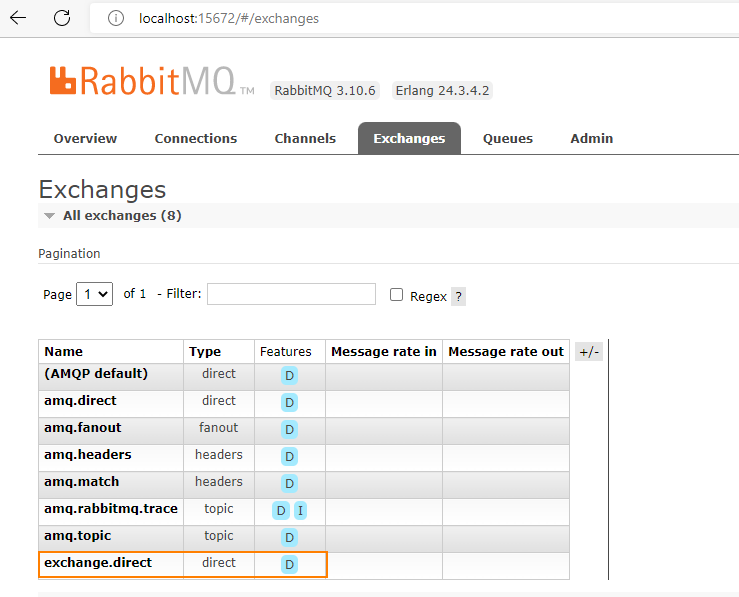
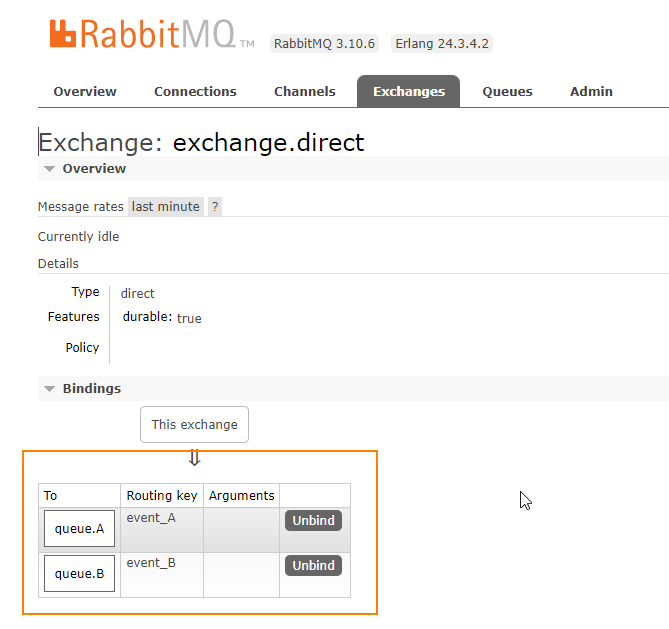
As we are connecting to RabbitMQ server on startup, it should create Direct Exchange and Queues and bindings in RabbitMQ instance.
We can check this by going to management console of RabbitMQ. It is available at
http://localhost:15672
username/password -> guest/guest
Below images confirm that exchange, queue and bindings created successfully on startup.
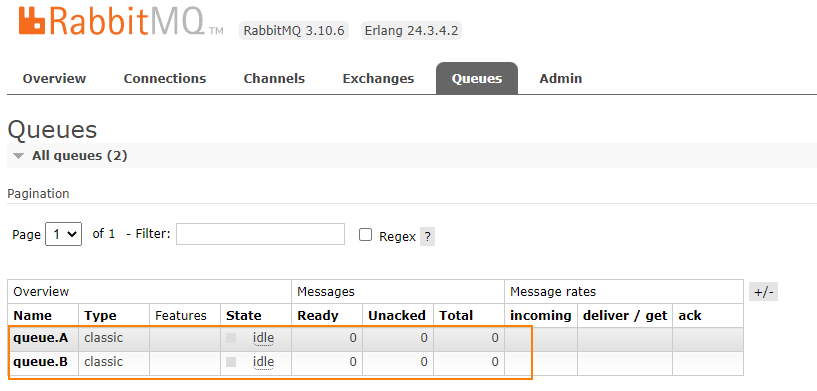
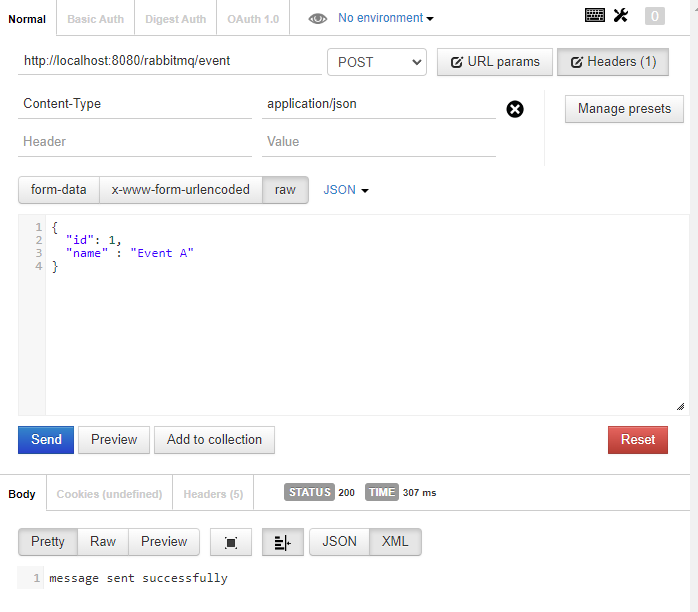
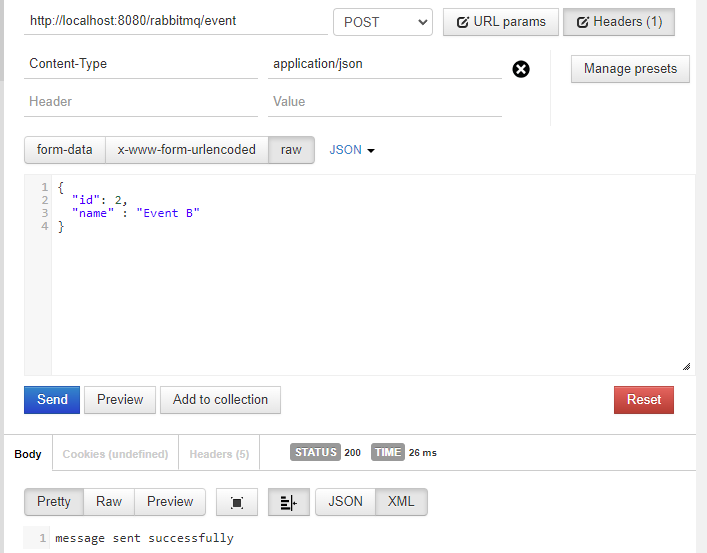
Publishing Messages
Let’s publish messages by sending request to controller class.
Let’s look at the management console.
Now each queue has one message as per their routing key

Consuming Messages
Now let’s develop a consumer application which consumes messages from RabbitMQ server.
First define MessageConverter to Convert Json String back to Object
package com.fullstackcode.sb.rabbitmq.consumer.config;


import org.springframework.amqp.support.converter.Jackson2JsonMessageConverter;
import org.springframework.amqp.support.converter.MessageConverter;
import org.springframework.context.annotation.Bean;
import org.springframework.context.annotation.Configuration;

@Configuration
public class RabbitMQConfiguration {

    @Bean
    MessageConverter messageConverter() {
        return new Jackson2JsonMessageConverter();
    }


}
Code language: Java (java)@RabbitListener annotation is used to receive messages from RabbitMQ queues.
Spring Boot will take care of converting message to corresponding Object
package com.fullstackcode.sb.rabbitmq.consumer.listener;

import com.fullstackcode.sb.rabbitmq.consumer.model.Event;
import lombok.extern.slf4j.Slf4j;
import org.apache.logging.log4j.message.Message;
import org.springframework.amqp.rabbit.annotation.RabbitListener;
import org.springframework.amqp.rabbit.core.RabbitTemplate;
import org.springframework.beans.factory.annotation.Autowired;
import org.springframework.stereotype.Component;

@Component
@Slf4j
public class RabbitMQConsummer {


    @RabbitListener(queues = "queue.A")
    private void receiveQueueA(Event event) {
       log.info("Event received from queue A -> {}",event.toString());

    }


    @RabbitListener(queues = "queue.B")
    private void receiveQueueB(Event event) {
        log.info("Event received from queue B -> {}",event);
    }
}
Code language: Java (java)
Once we start the consumer application, we can see following output on the console.
INFO  : Event received from queue A -> Event(id=1, name=Event A)
INFO  : Event received from queue B -> Event(id=2, name=Event B)Code language: Java (java)
Connecting to Remote Host
The above consumer example connects to RabbitMQ instance running in local
If you want to connect to instance running on server, you need specify the server address in application.properties
You can configureaddress like below
For SSL connection
spring.rabbitmq.addresses=amqps://<username>:<password>@<host>/<virtual-host>Code language: Java (java)For non-SSL connection
spring.rabbitmq.addresses=amqp://<username>:<password>@<host>/<virtual-host>Code language: Java (java)If you prefer individual properties, you can also configure like below
spring.rabbitmq.host=<host>
spring.rabbitmq.virtual-host=<virtaul-host>
spring.rabbitmq.port=5671 (SSL) or 5672 ( non - SSL)
spring.rabbitmq.username=<username>
spring.rabbitmq.password=<password>Code language: Java (java)
Note
RabbitMQ in general listens on port 5672. If RabbitMQ instance is running on SSL, it will listen on port 5671
Spring Boot Supported properties for RabbitMQ
# RABBIT (RabbitProperties)
spring.rabbitmq.addresses= # Comma-separated list of addresses to which the client should connect.
spring.rabbitmq.cache.channel.checkout-timeout= # Number of milliseconds to wait to obtain a channel if the cache size has been reached.
spring.rabbitmq.cache.channel.size= # Number of channels to retain in the cache.
spring.rabbitmq.cache.connection.mode=channel # Connection factory cache mode.
spring.rabbitmq.cache.connection.size= # Number of connections to cache.
spring.rabbitmq.connection-timeout= # Connection timeout, in milliseconds; zero for infinite.
spring.rabbitmq.dynamic=true # Create an AmqpAdmin bean.
spring.rabbitmq.host=localhost # RabbitMQ host.
spring.rabbitmq.listener.simple.acknowledge-mode= # Acknowledge mode of container.
spring.rabbitmq.listener.simple.auto-startup=true # Start the container automatically on startup.
spring.rabbitmq.listener.simple.concurrency= # Minimum number of consumers.
spring.rabbitmq.listener.simple.default-requeue-rejected= # Whether or not to requeue delivery failures; default `true`.
spring.rabbitmq.listener.simple.idle-event-interval= # How often idle container events should be published in milliseconds.
spring.rabbitmq.listener.simple.max-concurrency= # Maximum number of consumers.
spring.rabbitmq.listener.simple.prefetch= # Number of messages to be handled in a single request. It should be greater than or equal to the transaction size (if used).
spring.rabbitmq.listener.simple.retry.enabled=false # Whether or not publishing retries are enabled.
spring.rabbitmq.listener.simple.retry.initial-interval=1000 # Interval between the first and second attempt to deliver a message.
spring.rabbitmq.listener.simple.retry.max-attempts=3 # Maximum number of attempts to deliver a message.
spring.rabbitmq.listener.simple.retry.max-interval=10000 # Maximum interval between attempts.
spring.rabbitmq.listener.simple.retry.multiplier=1.0 # A multiplier to apply to the previous delivery retry interval.
spring.rabbitmq.listener.simple.retry.stateless=true # Whether or not retry is stateless or stateful.
spring.rabbitmq.listener.simple.transaction-size= # Number of messages to be processed in a transaction. For best results it should be less than or equal to the prefetch count.
spring.rabbitmq.password= # Login to authenticate against the broker.
spring.rabbitmq.port=5672 # RabbitMQ port.
spring.rabbitmq.publisher-confirms=false # Enable publisher confirms.
spring.rabbitmq.publisher-returns=false # Enable publisher returns.
spring.rabbitmq.requested-heartbeat= # Requested heartbeat timeout, in seconds; zero for none.
spring.rabbitmq.ssl.enabled=false # Enable SSL support.
spring.rabbitmq.ssl.key-store= # Path to the key store that holds the SSL certificate.
spring.rabbitmq.ssl.key-store-password= # Password used to access the key store.
spring.rabbitmq.ssl.trust-store= # Trust store that holds SSL certificates.
spring.rabbitmq.ssl.trust-store-password= # Password used to access the trust store.
spring.rabbitmq.ssl.algorithm= # SSL algorithm to use. By default configure by the rabbit client library.
spring.rabbitmq.template.mandatory=false # Enable mandatory messages.
spring.rabbitmq.template.receive-timeout=0 # Timeout for `receive()` methods.
spring.rabbitmq.template.reply-timeout=5000 # Timeout for `sendAndReceive()` methods.
spring.rabbitmq.template.retry.enabled=false # Set to true to enable retries in the `RabbitTemplate`.
spring.rabbitmq.template.retry.initial-interval=1000 # Interval between the first and second attempt to publish a message.
spring.rabbitmq.template.retry.max-attempts=3 # Maximum number of attempts to publish a message.
spring.rabbitmq.template.retry.max-interval=10000 # Maximum number of attempts to publish a message.
spring.rabbitmq.template.retry.multiplier=1.0 # A multiplier to apply to the previous publishing retry interval.
spring.rabbitmq.username= # Login user to authenticate to the broker.
spring.rabbitmq.virtual-host= # Virtual host to use when connecting to the broker.Code language: Java (java)
You can download source code from GitHub
producer – sureshgadupu/springboot-rabbitmq-producer (github.com)
consumer – sureshgadupu/springboot-rabbitmq-consumer (github.com)
You might be also interested in