Build Mac and Linux ARM64 Spring Boot 3 Native Image with GitHub Selfhost Runners
in this blog post I will explain how to build MacOS and Linux ARM64 native image for Spring boot 3 using GitHub Actions.
In one of my previous blog post, I have shown you, how to build and release the spring boot 3 native binary for windows, Linux and Mac OS using GitHub actions.
As GitHub provides only x86 based hardware runners, If we want to build the software for ARM64 based system we need to bring our own hardware called self runners
With the introduction of Apple Silicon based Macbooks, Mac OS is running on ARM64 based architecture. Linux also has support for ARM64 based hardware.
In this article we will see how to setup self-host runners for GitHub and build software using those runners.
Getting Hardware
As we are planning to build binaries for Mac and Linux ARM64 architecture, we need to get the corresponding hardware.
- Linux ( ARM64) – we can get the arm64 based Linux system freely from the oracle cloud. You can follow the instructions from here to create ARM64 based Linux system.
- Mac (ARM64) – We need get a mac mini/pro/studio based on apple silicon.
Installing Software
For GitHub self-host runner, we are responsible for installing OS updates and all other required tolls and software required.
We need to install following software in our system.
- Git
- Maven
- GraalVM ( Java 17) Community Edition
- GCC libraries
Adding self-hosted runners
For personal GitHub accounts, we can add a self-hosted runner to a repository. To add a self-hosted runner to a user repository, you must be the repository owner.
Go to your repository on GitHub
Click on the “Settings” tab

Click on “Actions -> runners ” in the left sidebar
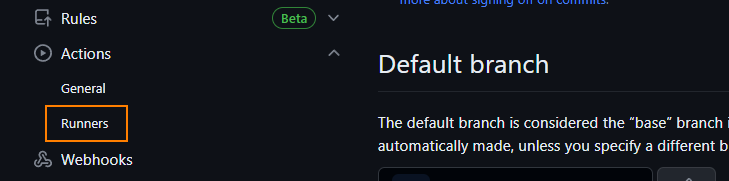
Click on “Add runner” in the “Self-hosted runners” section

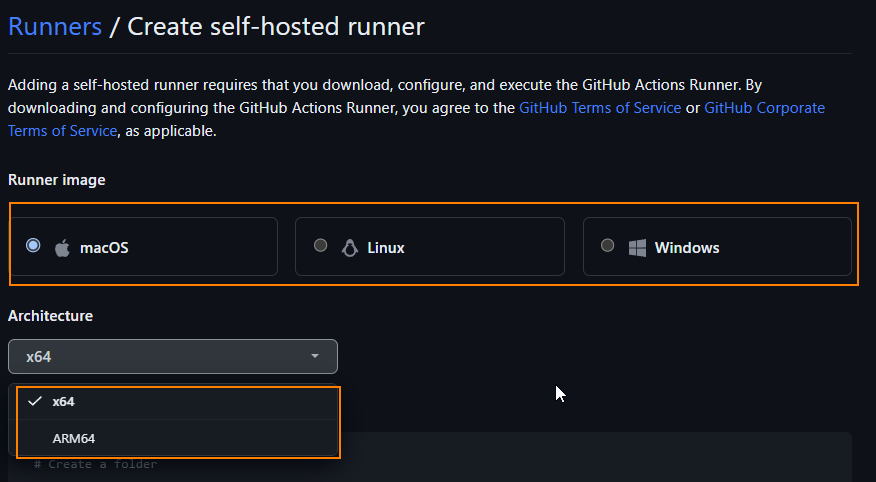
Select OS and Architecture and run the instructions provided on the systems.
In our case, we will select ARM64 architecture for both Mac and Linux
Once instructions are successfully run, it should show success message like below
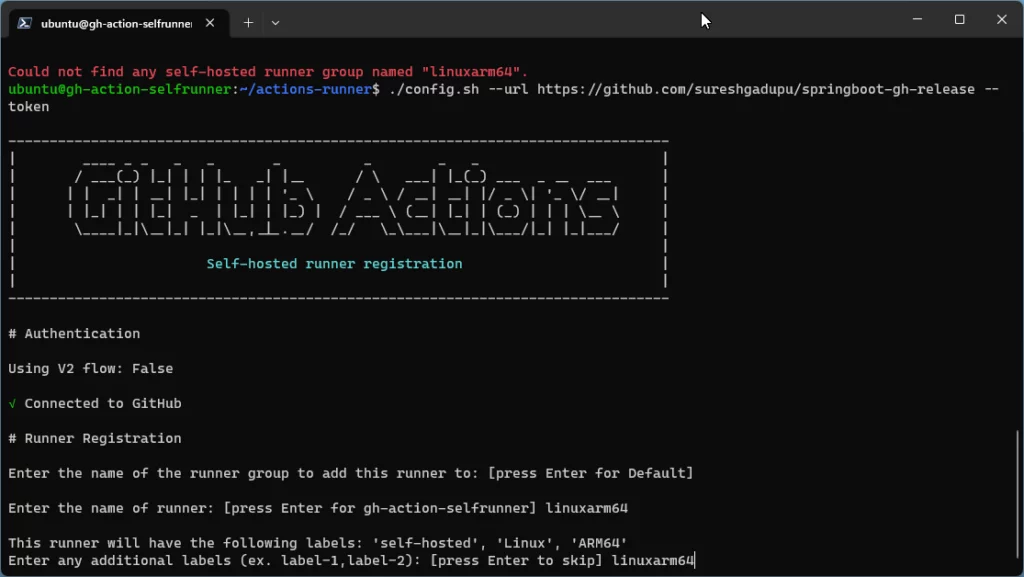
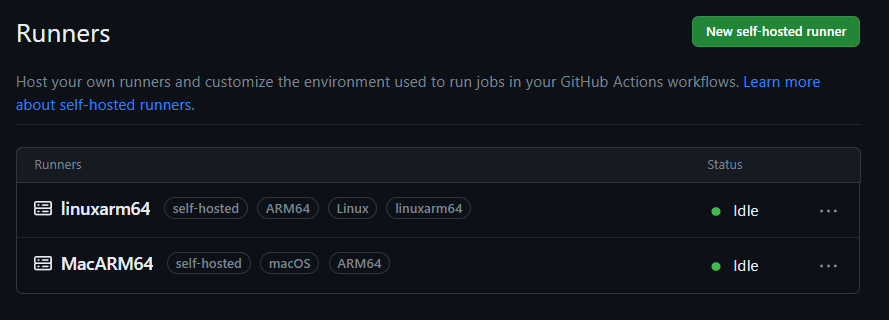
While configuring the self host runners, GitHub configuration scripts prompts you to enter labels which will identify the runner. By default each host ‘self-hosted’ as a label. We can enter additional labels to uniquely identify the each selfhost runner.
In above screenshot, we can see that self host runner is identified by following labels.
‘self-hosted’, ‘linux’, ‘arm64’, ‘linuxarm64’
These labels are used in GH action files.
Once you runt configuration script successfully, wait for the runner to show up in the “Self-hosted runners” section of the repository’s Actions settings page
Updating the Action Files
I will make use of the same repository I used to build x86 based native images. I will add additional configurations in release.yaml file to build ARM64 based images using above configured self-host runners.
Below you can find updated release.yaml file.
Line No 24-29 added to use the configured self host runners and build the image. We used the “OS” tag to identify the
name: "Release"
on: # yamllint disable-line rule:true
push:
tags:
- "**"
jobs:
build-native-image:
name: SpringBoot Native Application on ${{ matrix.os }}
runs-on: ${{ matrix.os }}
strategy:
matrix:
include:
- os: ubuntu-latest
artifact_name: sb3-native-image
asset_name: sb3-native-image-linux-amd64
- os: windows-latest
artifact_name: sb3-native-image.exe
asset_name: sb3-native-image-windows-amd64.exe
- os: macos-latest
artifact_name: sb3-native-image
asset_name: sb3-native-image-macos-amd64
- os: linuxarm64
artifact_name: sb3-native-image
asset_name: sb3-native-image-linux-arm64
- os: ['macOS','ARM64']
artifact_name: sb3-native-image
asset_name: sb3-native-image-macos-arm64
steps:
- uses: actions/checkout@v3
- uses: graalvm/setup-graalvm@v1
with:
version: '22.3.1'
java-version: '17'
components: 'native-image'
github-token: ${{ secrets.GITHUB_TOKEN }}
native-image-job-reports: 'true'
- name: Build with Maven
run: mvn --batch-mode -Pnative native:compile
- name: Upload binaries to release
uses: svenstaro/upload-release-action@v2
with:
repo_token: ${{ secrets.GITHUB_TOKEN }}
file: target/${{ matrix.artifact_name }}
asset_name: ${{ matrix.asset_name }}
tag: ${{ github.ref }}
Code language: Java (java)Build and Release Image
After updating release.yaml file, commit the changes to repo.
For building and releasing the tagged version run below commands.
git tag -s 0.1.5Code language: Java (java)git push --tagCode language: Java (java)If you observe the Action tab under your repo in GitHub, it will invoke the release workflow.
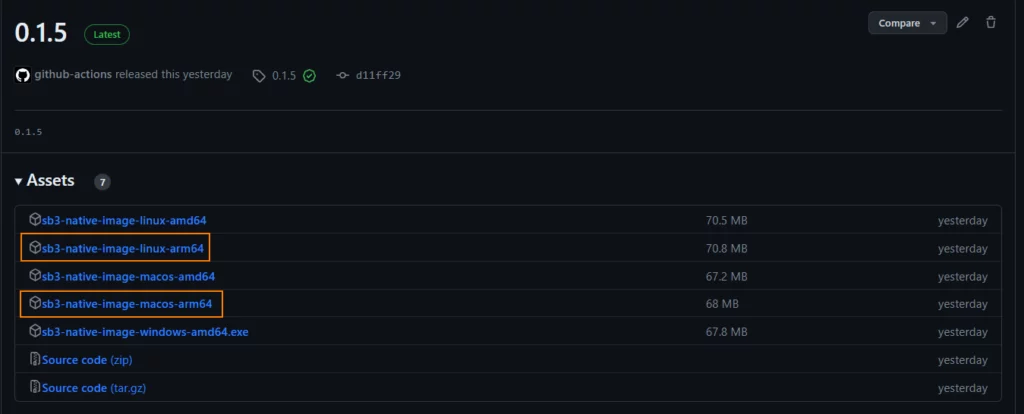
If workflow action runs successfully, you should see the release of X86 and ARM64 images with given tag name as shown in below image.