Spring Boot CRUD example with REST API
Spring Boot makes it easy to create stand-alone, production-grade Spring based applications with minimal configuration. In this article, we will create a Spring Boot CRUD example with REST API. We will use a H2 database to store data.
We’ll be creating a simple Employee Management System where employees can be created, read, updated and deleted.
Setting Up Project
This section will walk through the steps necessary to setup a Spring Boot application for developing RESTful APIs.
Go to Spring Initializr and add the following starter dependencies to a project.
- Web
- JPA
- H2
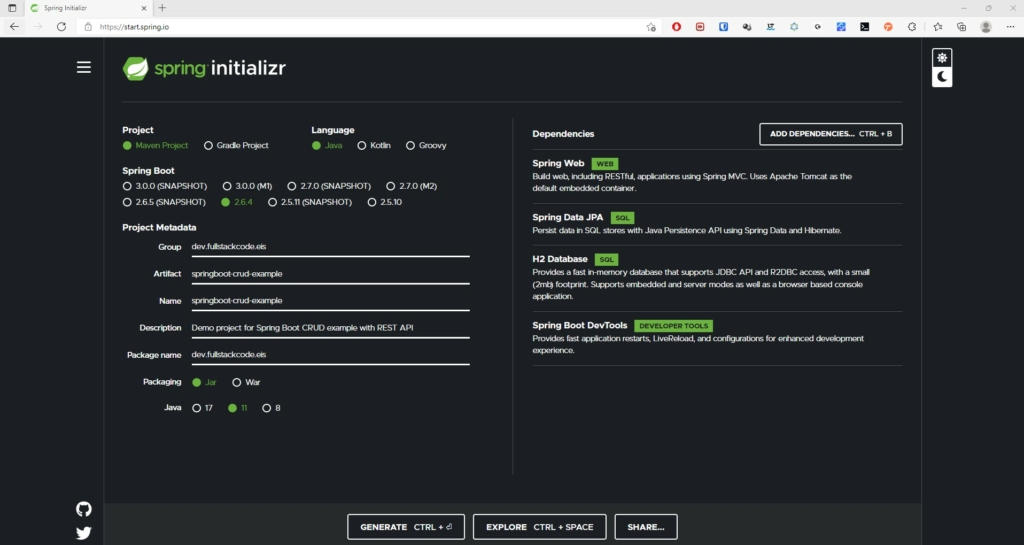
Change the Name to “springboot-crud-example” and then click on “Generate” button. A .zip will download. Unzip it. Inside you’ll find a simple, Maven-based project including a pom.xml build file (NOTE: You can use Gradle. The examples in this tutorial will be Maven-based.)
Import the project to your favorite IDE.
Configure Data Source Properties
We configure Data Source properties in application. properties file. As we are using H2 database
spring.datasource.url=jdbc:h2:mem:testdb;DB_CLOSE_ON_EXIT=FALSE;
spring.datasource.username=sa
spring.datasource.password=password
spring.datasource.driverClassName=org.h2.Driver
spring.jpa.database-platform=org.hibernate.dialect.H2Dialect
spring.jpa.show-sql=true

spring.datasource.initialization-mode=always
spring.jpa.defer-datasource-initialization=true
spring.jpa.hibernate.ddl-auto=create-drop
spring.sql.init.mode=always

spring.h2.console.path=/h2-console
spring.h2.console.settings.trace=false
spring.h2.console.settings.web-allow-others=false
Inserting sample data into database
create a file with .sql extension in resources directory and put insert sql commands to initialize the database during startup.
ALTER SEQUENCE hibernate_sequence RESTART WITH 1;

DELETE FROM EMPLOYEE;
DELETE FROM DEPARTMENT;


INSERT INTO DEPARTMENT(id,dept_name) VALUES(100,'HR');
INSERT INTO DEPARTMENT(id,dept_name) VALUES(101,'PDE');
INSERT INTO DEPARTMENT(id,dept_name) VALUES(102,'Marketing');


INSERT INTO EMPLOYEE(id,first_name,last_name,gender,birth_date,hire_date,department_id) VALUES(100,'Alex','Bonilla','M','1990-12-07','2011-04-01',100);
INSERT INTO EMPLOYEE(id,first_name,last_name,gender,birth_date,hire_date,department_id) VALUES(200,'Duke','Stacey','M','1989-07-11','2012-08-21',100);
INSERT INTO EMPLOYEE(id,first_name,last_name,gender,birth_date,hire_date,department_id) VALUES(300,'Hayley','Drake','M','1992-10-01','2007-07-06',101);
INSERT INTO EMPLOYEE(id,first_name,last_name,gender,birth_date,hire_date,department_id) VALUES(400,'Nancie','Beasley','M','1978-02-21','2003-03-03',101);
INSERT INTO EMPLOYEE(id,first_name,last_name,gender,birth_date,hire_date,department_id) VALUES(500,'Wyatt','Holder','M','1994-12-01','2016-02-15',101);
INSERT INTO EMPLOYEE(id,first_name,last_name,gender,birth_date,hire_date,department_id) VALUES(600,'Tobey','Drake','M','1992-10-01','2014-06-11',102);
INSERT INTO EMPLOYEE(id,first_name,last_name,gender,birth_date,hire_date,department_id) VALUES(700,'Marvin','Hope','F','1978-02-21','2003-09-10',102);
INSERT INTO EMPLOYEE(id,first_name,last_name,gender,birth_date,hire_date,department_id) VALUES(800,'Ibrar','Garcia','F','1994-12-01','2004-12-21',102);
Code Domain Model Class
I am defining following two entities.
- Department
- Employee
Department and Employee entities have 1:N relationship
Department entity class
@Entity
public class Department implements Serializable {
@Id
@GeneratedValue(strategy = GenerationType.AUTO)
private Integer id;
private String dept_name;
@OneToMany(
mappedBy = "department",
cascade = CascadeType.ALL,
orphanRemoval = true
)
@JsonIgnore
private List<Employee> employees;
public Department() {
}
}Code language: Java (java)Employee entity class
@Entity
public class Employee implements Serializable {

    @Id
    @GeneratedValue(strategy = GenerationType.AUTO)
    private Integer id;
    private String first_name;
    private String last_name;

    @Enumerated(EnumType.STRING)
    private Gender gender;

    private LocalDate birth_date;
    private LocalDate hire_date;

    @ManyToOne
    @JoinColumn(name = "department_id")
    private Department department;


    public Employee() {

    }

....
}Code language: Java (java)
Coding Repository Interfaces
Let’s define repository classes corresponding to Employee and Department entities.
public interface DepartmentRepository extends JpaRepository<Department,Integer> {
}
Code language: Java (java)
public interface EmployeeRepository extends JpaRepository<Employee,Integer> {
}Code language: Java (java)Code Service Class
@Service
public class EmployeeService {

    @Autowired
    EmployeeRepository employeeRepository;

    @Autowired
    DepartmentRepository departmentRepository;

    public List<Employee> getAllEmployees() {
        return employeeRepository.findAll();
    }

    public Employee getEmployeeById(Integer id) {
        return employeeRepository.findById(id).orElseThrow( () -> new ResponseStatusException(HttpStatus.NOT_FOUND,"Resource Not found") );
    }

    public Employee createEmployee(Employee employee) {
        return employeeRepository.save(employee);
    }

    public Employee updateEmpDepartment(Integer emp_id , Integer dept_id) {
        Employee employee = employeeRepository.getById(emp_id);
        if(employee == null) {
            throw new RestClientException("Employee with id "+emp_id+" not found");
        }

        Department department = departmentRepository.getById(dept_id);
        if(department == null) {
            throw new RestClientException("Department with id "+dept_id+" not found");
        }

        employee.setDepartment(department);
        employeeRepository.save(employee);

        return employee;
    }

    public List<Employee> findEmployeesByGender(Gender gender) {
        return employeeRepository.findByGender(gender);
    }

    public  List<Employee> searchEmployeesByGender(Gender gender) {
        return employeeRepository.searchByGender(gender);
    }

    public Employee updateEmployee(Employee employee) {
        Employee emp = employeeRepository.getById(employee.getId());
        if(emp == null) {
            throw new RestClientException("Employee with id "+employee.getId()+" not found");
        }
        return employeeRepository.save(employee);
    }

    public void deleteEmployee(Integer id) {
         employeeRepository.deleteById(id);
    }
}

Code language: Java (java)
Code REST Controller Class
Let’s implement CRUD functionality.
In Spring’s approach to building RESTful web services, HTTP requests are handled by a controller.
First we will create a EmployeeController class which contains all handler methods.
@RestController
@RequestMapping("/employee")
public class EmployeeController {

    @Autowired
    EmployeeService employeeService;
}Code language: Java (java)
@RestController – annotation identifies spring boot Rest controller. The Spring Boot controller class returns domain object rather than a view for each method.
You can also mark every controller with @controller annotation but to return the domain object you need to add @ResponseBody annotation to class.
@RequestMapping annotation tells path to invoke this controller. This annotation can be used at class level and method level.
Difference between @RestController and @Controller
The @Controller is a specialization of @Component annotation while @RestController is a specialization of @Controller annotation
One of the key differences is once you mark a class @RestController then every method is written a domain object instead of a view.
Another key difference is that you don’t need to use @ResponseBody with @RestController annotationon every handler method
@RestController is shot hand for including both @Controller and @ResponseBody
Create Operation
As the first handler method we will implement “Create” functionality.
HTTP POST method is used to create a new resource on the server
For creating Employee, we will send the employee data to server in request body.
@RestController
@RequestMapping("/employee")
public class EmployeeController {

    @Autowired
    EmployeeService employeeService;

    @PostMapping
    public Employee createEmployee(@RequestBody Employee employee) {
        return employeeService.createEmployee(employee);
    }
}Code language: Java (java)
@PostMapping – annotation ensures that HTTP POST requests to /employee are mapped to createEmployee method.
You can also use @RequestMapping(method=POST) annotation. @PostMapping is short form form of it.
@RequestBody – Binds the request body of the POST method to Employee object of createEmployee method.
HTTP POST method, by default sends response code 200 (HttpStatus.OK) when object is successfully created.
Since POST method creates object on the server it is better to create status 201 (HttpStatus.CREATED) indicating that the request has succeeded and has led to the creation of a resource.
To return Http status code 201, you can add @ResponseStatus annotation to post method like below
    @ResponseStatus(HttpStatus.CREATED) // send HTTP status code 201 instead of 200
    @PostMapping
    public Employee createEmployee(@RequestBody Employee employee) {

        return employeeService.createEmployee(employee);
    }
Retrieve Operation
Next we look at the retrieve functionality.
HTTP GET method is used to retrieve resource from server.
For retrieving Employee data ,we use HTTP GET method.
@RestController
@RequestMapping("/employee")
public class EmployeeController {

    @Autowired
    EmployeeService employeeService;

    @GetMapping("/{id}")
    public Employee getEmployee(@PathVariable Integer id) {
        Employee emp = employeeService.getEmployeeById(id);
        return emp;
    }

    @GetMapping()
    public List<Employee> getEmployees() {
        return employeeService.getAllEmployees();
    }
}Code language: Java (java)
The @GetMapping annotation ensures that HTTP GET requests to /employee are mapped to the getEmployee()/getEmployees method.
value=”/{id}”
We have defined 2 get method.
getEmployee(@PathVariable Integer id) – method retrieves the individual employee information based on the id provided.
@binds the value of the path string parameter PathVariable id into the id parameter of the getEmployee()
HTTP GET method with url http://localhost:8080/employee/100 – will fetch the employee information of Emp Id : 100.
in above URL 100 is path parameter, which can be passed dynamically.
If you want name path variable and method parameter differently, you need to specify the path variable name like below to bind them.
@GetMapping("/{empid}")
    public Employee getEmployee(@PathVariable("empid") Integer id) {
        Employee emp = employeeService.getEmployeeById(id);
        return emp;
    }Code language: Java (java)
HTTP GET method with url http://localhost:8080/employee – will retrieve the information of all employees.
Update Operation
Next we look at the update functionality.
HTTP PUT method is used to update resource on server.
@RestController
@RequestMapping("/employee")
public class EmployeeController {

    @Autowired
    EmployeeService employeeService;

    @PutMapping()
    public Employee updateEmployee(@RequestBody Employee employee) {
        return employeeService.updateEmployee(employee);
    }
}Code language: Java (java)
In some cases HTTP PATCH method is used to update the resource.
The HTTP PATCH request method applies partial modifications to a resource.
A PATCH request is considered a set of instructions on how to modify a resource
 @PatchMapping("/{empId}/dept/{deptId}")
    public Employee updateEmpDepartment(@PathVariable("empId") Integer emp_id , @PathVariable("deptId") Integer dept_id) {
       return employeeService.updateEmpDepartment(emp_id,dept_id);
    }Code language: Java (java)
You can also send data in request body
@PatchMapping("/{empId}")
    public Employee updateEmpDepartmentbYId(@PathVariable("empId") Integer emp_id , @RequestBody Department department) {
        return employeeService.updateEmpDepartment(emp_id,department.getId());
    }Code language: Java (java)
Note
Some API implementations use HTTP POST method to update resource on server.
Delete Operation
Next we look at the update functionality.
HTTP DELETE method is used to delete resource on server.
@DeleteMapping(value="/{id}")
    public  void deletePost(@PathVariable("id") Integer id){
        employeeService.deleteEmployee(id);
    }Code language: Java (java)
Testing Rest API
Now let’s test the developed REST API.
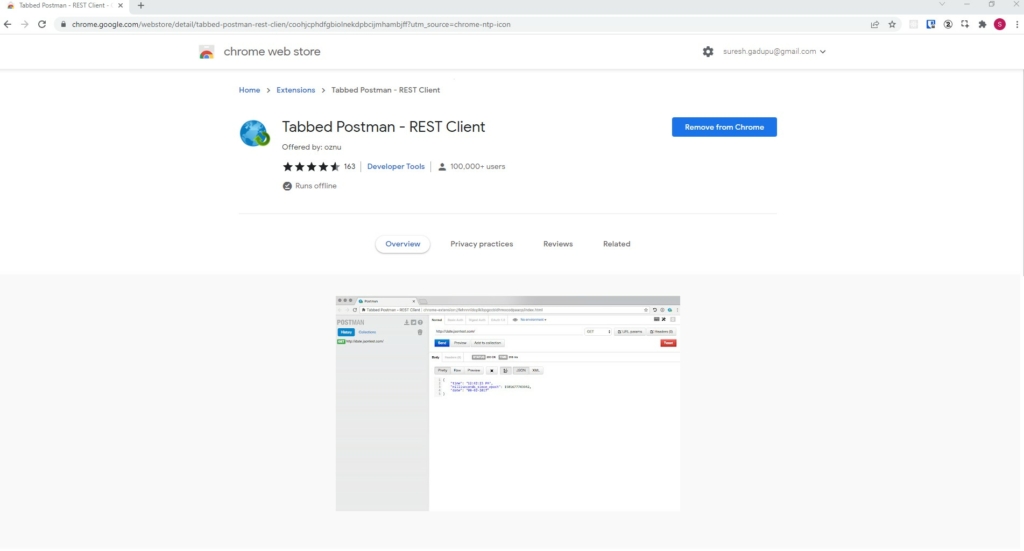
We need a REST client to test the functionality. I am going to use Tabbed Postman Rest client. This Rest client is chrome browser extension.
First start the Spring Boot application.
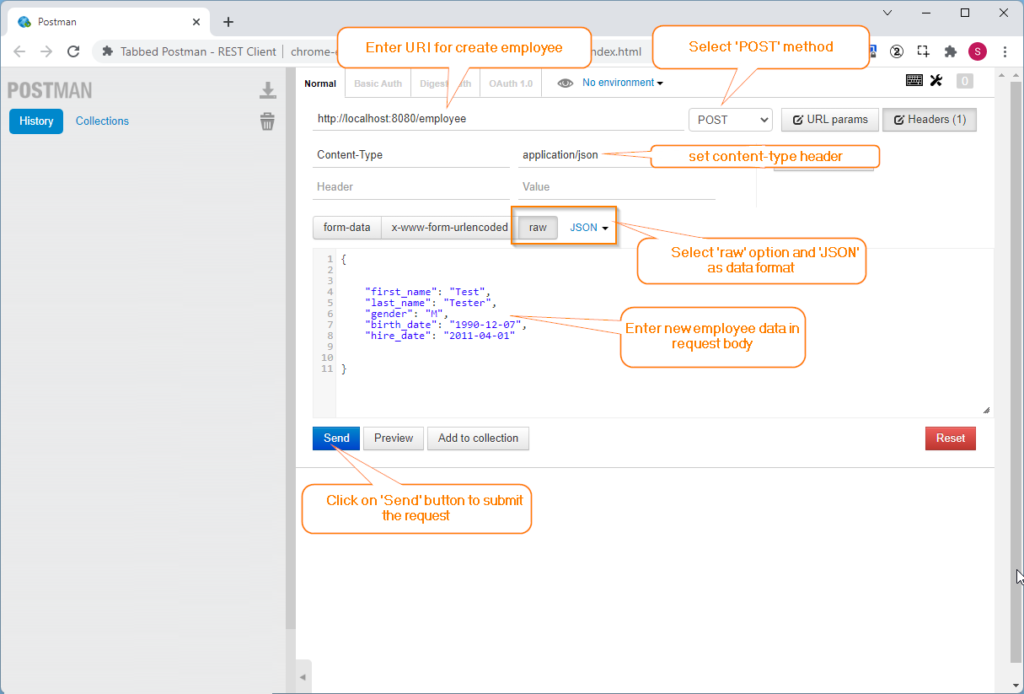
- Testing Create Employee
Open the Tabbed postman Rest client in browser and select the required details as shown below and click on send button
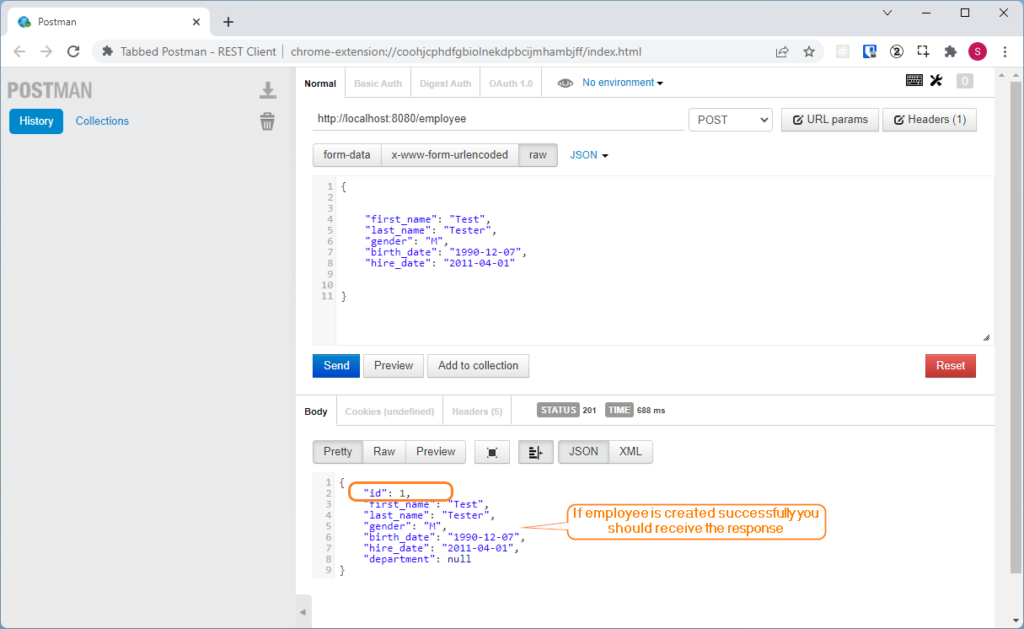
If the request is successful, new Employee will be created and id will be assigned him.
2. Testing Retrieve Employee
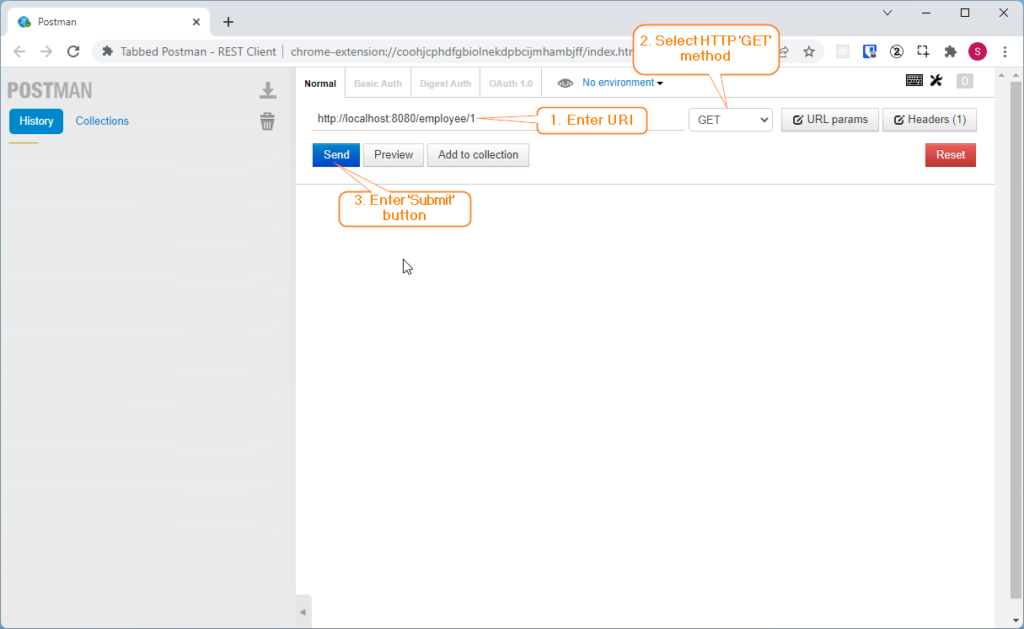
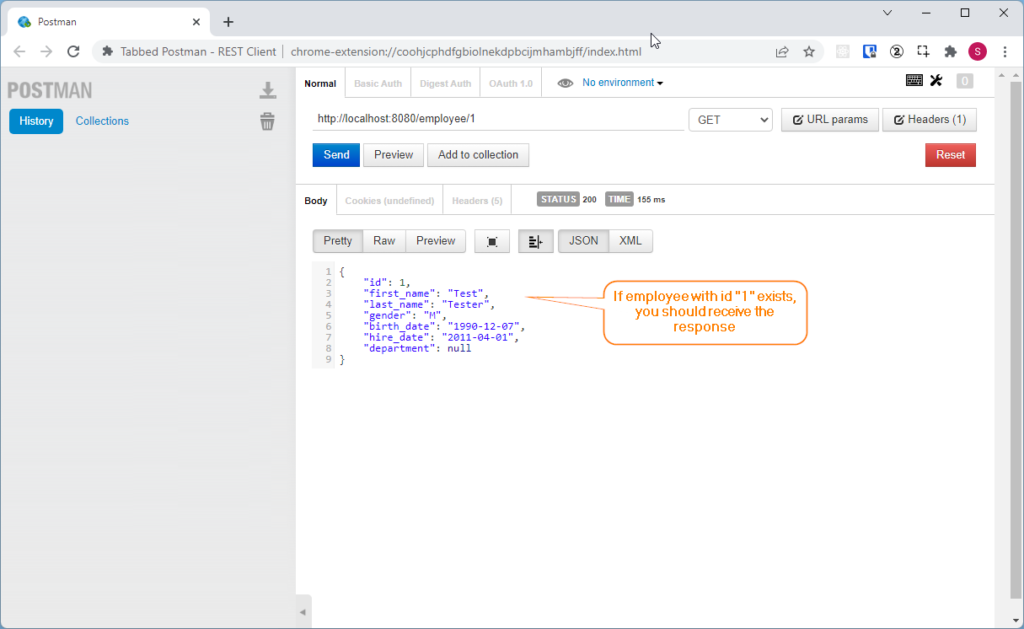
If employee exists with given id in the url , we should receive response
3. Testing Update functionality
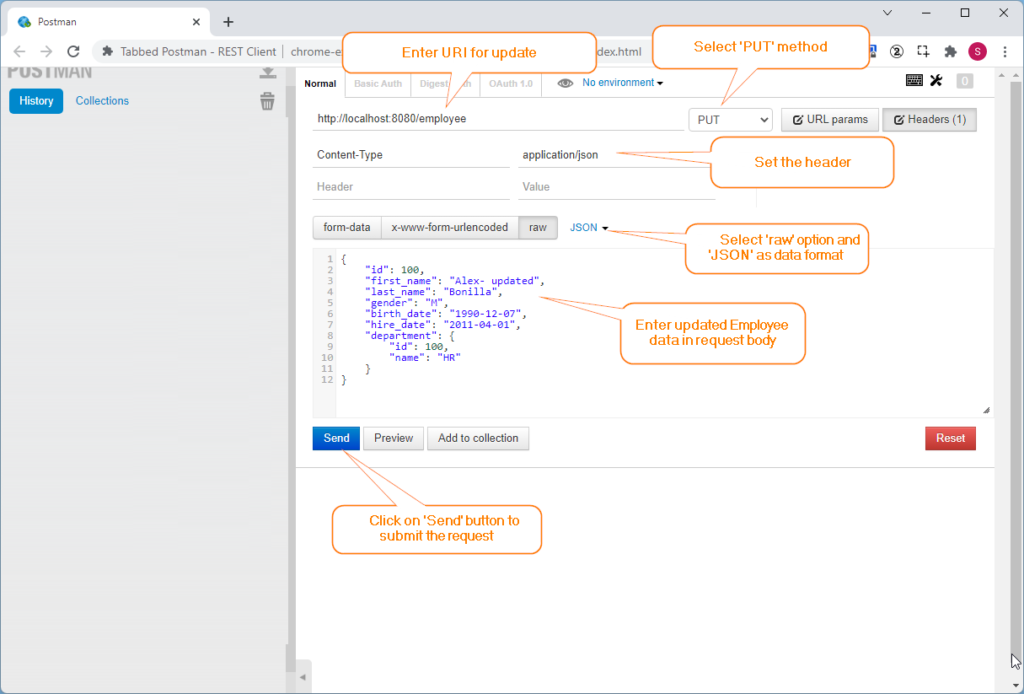
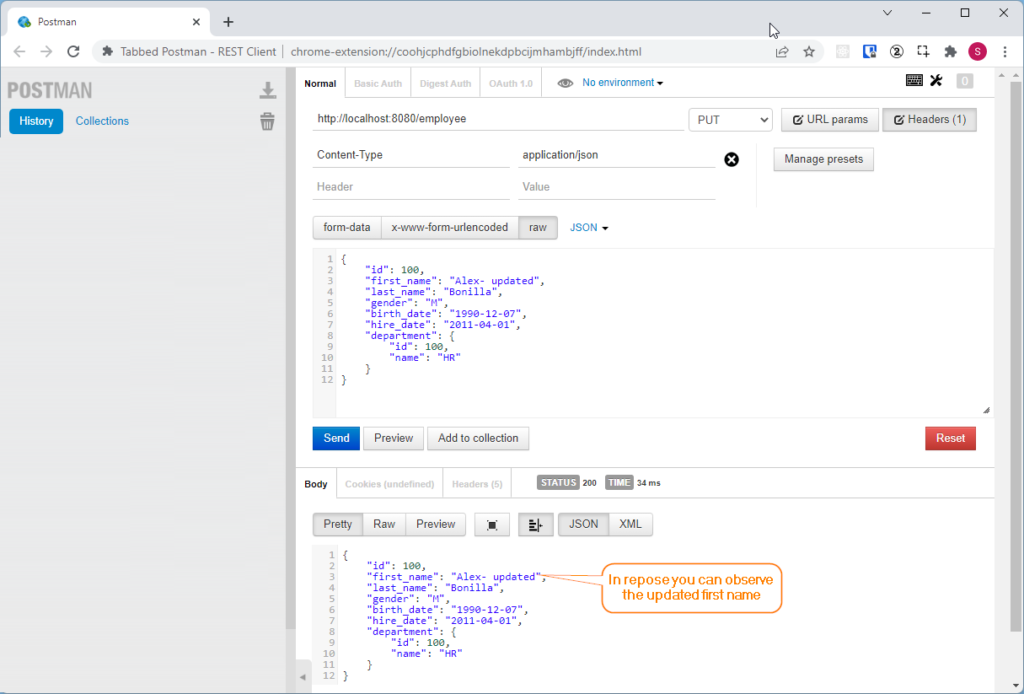
If employee record updated successfully, you should receive response like below
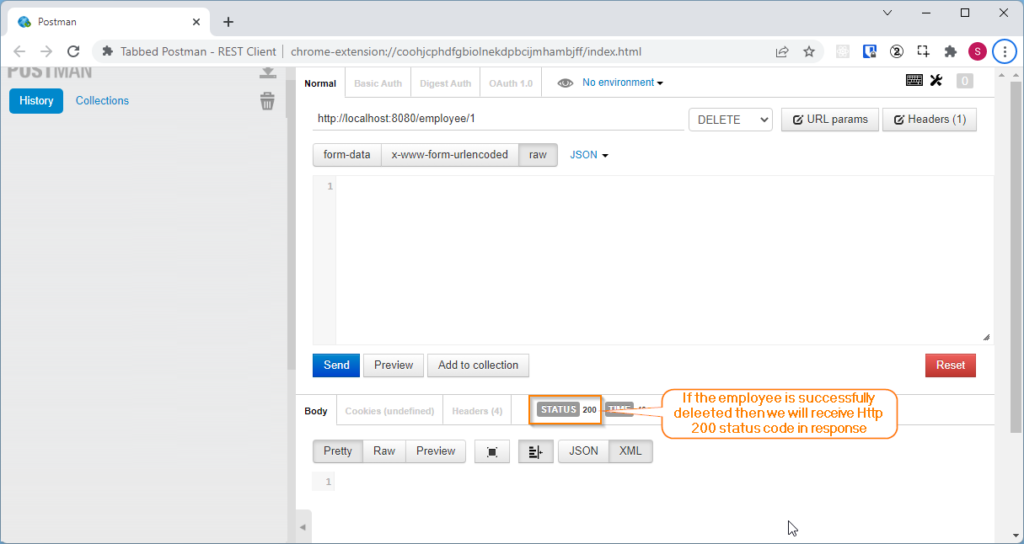
4. Testing Delete functionality
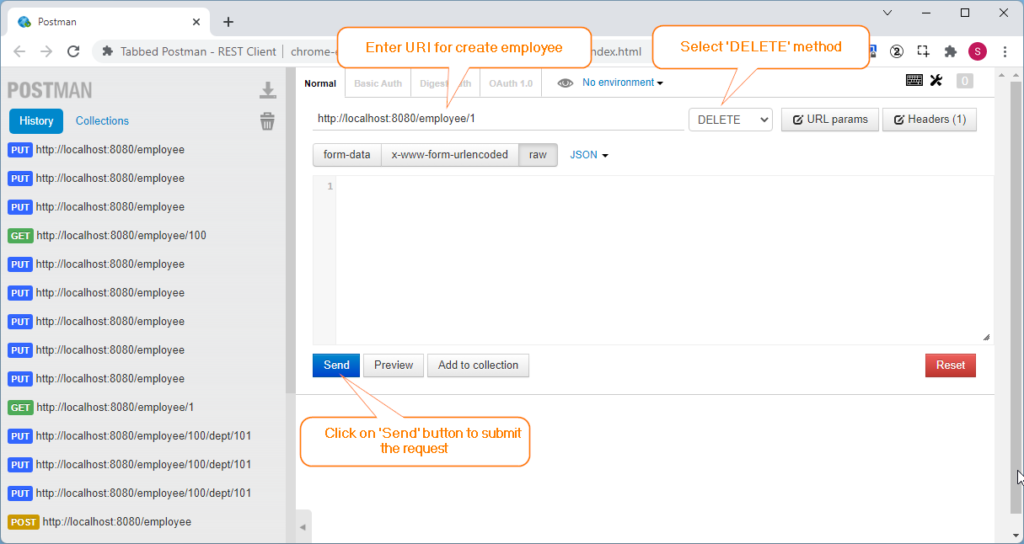
If employee delete successfully, then we will not receive any response, we will only receive http status code 200.
Source code for blogpost can be downloaded from GitHub
You might be interested in