Dockerizing Spring Boot Application – Best Practices
Dockerizing Spring Boot applications is becoming more and more popular. It offers many advantages, such as portability, reproducibility and consistency.However, there are a few things to watch out for when dockerizing Spring Boot applications. In this article, we will take a look at some of the best practices to be followed when dockerizing Spring Boot applications.
I have already covered basic of creating docker images for Spring Boot application in below blog post
Smaller Images
If we look at the size of docker images they tend to bulky even though actual application code is very small as we are packaging the OS and runtime.
If we look at the image size of springboot-crud-example the size is around 300 mb.

Size of the docker image depends on base image used in the FROM command.
Let’s take a look at the docker file we used to build the springboot-crud-example image
FROM adoptopenjdk/openjdk11:x86_64-alpine-jdk-11.0.14.1_1-slim
ARG JAR_FILE=target/*.jar
COPY ${JAR_FILE} app.jar
EXPOSE 8080
ENTRYPOINT ["java","-jar","/app.jar"]
Here I am already trying to use the Alpine Linux based JDK image which has one of the smallest base image.
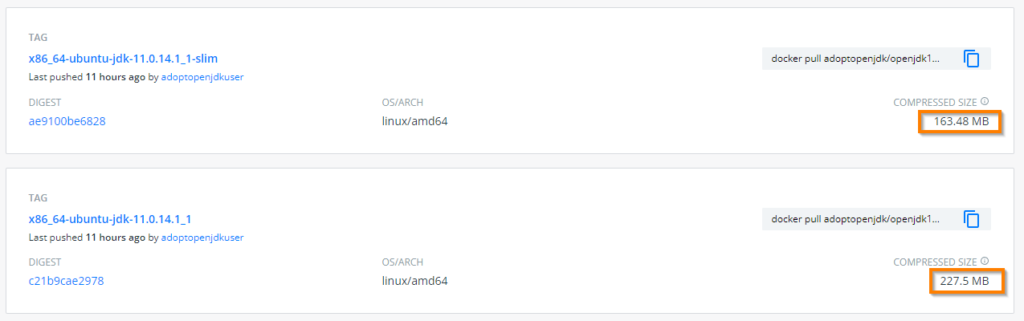
If you look at the docker hub, base image has size of 126 MB ( compressed).

If you plan to use ubuntu based images, the resulting image size might be higher as their image size greater than the Alpine based image.
If you are planning to use Debian based images, you can consider using Liberica JDK images from Bell soft. These have one of the smallest images compared to other JDK providers.
One way to reduce the size of the image is to use the JRE instead of JDK.
In above Docker file we are already copying the compiled source code(jar), So we need only JRE run our application. By switching to JRE image we can reduce the image size.
By changing the base image, we can educe the image size significantly.
FROM adoptopenjdk/openjdk11:x86_64-alpine-jre-11.0.14.1_1
ARG JAR_FILE=target/*.jar
COPY ${JAR_FILE} app.jar
EXPOSE 8080
ENTRYPOINT ["java","-jar","/app.jar"]
In below screenshot you can observe that image size reduced by more than 100 MB compared to JDK version.

Note
Using JRE instead of JDK may not be applicable to all application as some applications require JDK to run.
Note
If you are planning to use Alpine Linux as your base image in production , please go through the below links for more in depth analysis
https://naiveskill.com/docker-base-image/
https://nickjanetakis.com/blog/benchmarking-debian-vs-alpine-as-a-base-docker-image
In the era of unlimited bandwidth, Image size may not be matter much but sticking to lowest possible image size is good idea.
It is not easy to conclude what is the best possible JDK/JRE base image for your application , if size is not a big issue stick to the same OS and JDK version which you use for development.
Memory and CPU Usage
As most of the applications are running on the cloud, memory and processor usage by the containers is one of important factors to run applications cost-effectively. So we need to select the JDK/JRE which uses smallest possible memory and CPU by default while running the application.
I tried with few JDK/JREs but Eclipse OpenJ9 is the clear winner in this space. If you are looking to run the containers in memory constrained systems open-J9 JDK/JRE is best option.
FROM adoptopenjdk/openjdk11-openj9:x86_64-alpine-jre-11.0.14.1_1_openj9-0.30.1
ARG JAR_FILE=target/*.jar
COPY ${JAR_FILE} app.jar
EXPOSE 8080
ENTRYPOINT ["java","-jar","/app.jar"]
By using `Docker stats` command we can see the CPU and memory usage by the container.
In below images, you can clearly see that container started with open-J9 JDK using less memory and CPU compared to other containers using normal JDK and JRE.

Note
Please do not confuse with Eclipse Open-J9 with JDK version 9.Both are completely different . You can get more information on Eclipse-OpenJ9 from the official website
Using Exploded JAR
When build Spring Boot application it makes single fat jar. We were copying the fat jar to docker image and starting the application.
While using fat jar approach, there is always some overhead, and in a containerized environment, this can be noticeable. It’s best to unpack your jar and run it in an exploded state.
The second issue with the file is that it is inefficient if your application is frequently updated. Docker images are built in layers, and your application and all of its dependencies are placed in a single layer in this case. Because you’re probably recompiling your code more frequently than you’re upgrading the version of Spring Boot you’re using, it’s often better to separate things a little more. If you place jar files in the layer before your application classes, Docker will often only need to change the very bottom layer and will pick up others from its cache.
When build Spring Boot application it makes single fat jar. I we look inside the Jar, it has layers (directories).
If we unpack it we can see that it is already divided into external and internal dependencies.
To use exploded jar approach we need to first unpack the jar and copy the required jars and classes to docker image.
Create directory and explode the jar into created directory
mkdir target/dependency
cd target/dependency; jar -xf ../*.jarCode language: Java (java)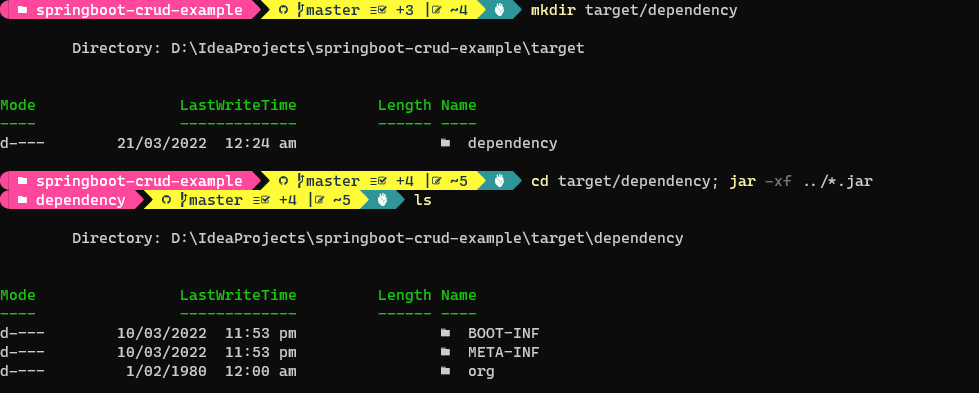
For exploded jar version, We can use the following Dockerfile.
FROM adoptopenjdk/openjdk11:x86_64-alpine-jdk-11.0.14.1_1-slim
VOLUME /tmp
ARG DEPENDENCY=target/dependency
COPY ${DEPENDENCY}/BOOT-INF/lib /app/lib
COPY ${DEPENDENCY}/META-INF /app/META-INF
COPY ${DEPENDENCY}/BOOT-INF/classes /app
EXPOSE 8080
ENTRYPOINT ["java","-cp","app:app/lib/*","dev.fullstackcode.eis.SpringbootCrudExampleApplication"]
Each COPY command creates a layer in docker image. There are now three layers in above Docker file , with all the application resources in the later two layers. If the application dependencies do not change, the first layer (from BOOT-INF/lib) need not change, so the build is faster, and the startup of the container at runtime if also faster, as long as the base layers are already cached.
The above docker file assumes that , you have exploded jar at the CLI.
You can also explode the fat jar file inside docker , if you don’t want to run the commands on CLI after building jar.
You can use below Dockerfile to achieve that. This process is also called multi stage build.
FROM adoptopenjdk/openjdk11:x86_64-alpine-jdk-11.0.14.1_1-slim as stage1
VOLUME /tmp
ARG JAR_FILE=target/*.jar
COPY ${JAR_FILE} app.jar
RUN mkdir -p /app/dependency
WORKDIR /app/dependency
RUN jar -xf ../../app.jar

FROM adoptopenjdk/openjdk11:x86_64-alpine-jdk-11.0.14.1_1-slim
ARG DEPENDENCY=app/dependency
COPY --from=stage1 ${DEPENDENCY}/BOOT-INF/lib /app/lib
COPY --from=stage1 ${DEPENDENCY}/META-INF /app/META-INF
COPY --from=stage1 ${DEPENDENCY}/BOOT-INF/classes /app
EXPOSE 8080
ENTRYPOINT ["java","-cp","app:app/lib/*","dev.fullstackcode.eis.SpringbootCrudExampleApplication"]
Security
By default docker container runs the process as a root user.
You can verify this by running a shell command inside container.
First start the container and you can get access to shell by running a below command.
docker exec -it <container-name>/<container-id> /bin/sh

This precaution limits the capabilities of anyone who manages to break out of your application and run system commands inside the container (following the principle of least privilege).
Instead of root user , image should contain a non-root user that runs the application.
In a Dockerfile, you can achieve this by adding another layer that adds a (system) user and group and setting it as the current user (instead of the default, root).
FROM adoptopenjdk/openjdk11:x86_64-alpine-jdk-11.0.14.1_1-slim
ARG JAR_FILE=target/*.jar
COPY ${JAR_FILE} app.jar
RUN addgroup -S springboot && adduser -S sbuser -G springboot
USER sbuser
EXPOSE 8080
ENTRYPOINT ["java","-jar","/app.jar"]
RUN addgroup -S springboot && adduser -S sbuser -G springboot – adds system group named springboot and adds a user sbuser and adds him to group springboot
USER sbuser – switches user to sbuser
We can confirm the user switch by running the container and starting the shell .

References