Run DB2 Database with Docker Compose

This tutorial will show you how to setup DB2 database (community edition) with Docker Compose.
While DB2 database is commercial product, it also provides community edition with limitations on resources which is free to use.
Community Edition has following limitations, which are automatically enforced:
- Memory limit: 16GB
- Core limit: 4 cores
Required Software
Now Let’s look at the process to run DB2 database community edition as docker container
Starting Database with Docker Command
You can start DB2 database with following docker command
docker run -d --name db2server --privileged=true -p 50000:50000 -e LICENSE=accept -e DB2INST1_PASSWORD=test -e DBNAME=testdb ibmcom/db2Code language: plaintext (plaintext)DB2INST1_PASSWORD environment variable sets password for Database administrator.
Note
Default instance name for db2 database in DB2INST1. If you want change it, you can configure it via DB2INSTANCE environment variable
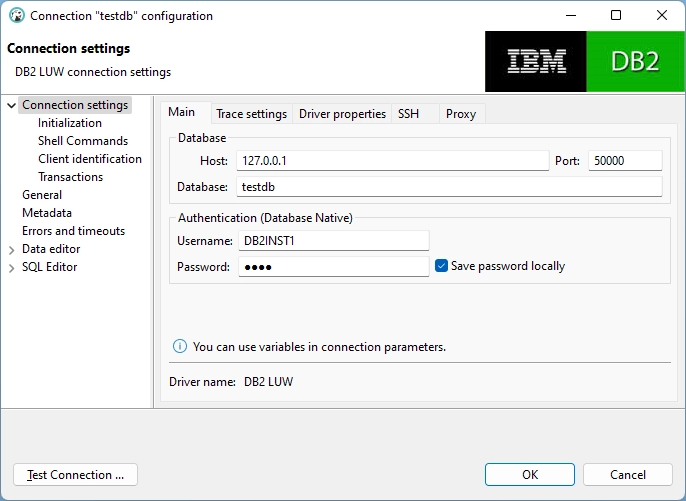
Once database container started we can access database using DBeaver with following properties
- Host Name : localhost or 127.0.0.1
- Port : 50000
- Database : testdb
- User Name : DB2INST1
- Password : test ( as per docker run command)

Note
Creation of database takes time. Please wait for 3-5 min. before connecting to database.You can also observe that container logs and look for the message “Setup has completed.“
you can check the logs for container with following command.
docker logs -f <your_container_name>
Starting Database with docker-compose file
Step 1) create a new directory for the project and navigate into it
mkdir db2server && cd db2serverCode language: DOS .bat (dos)Step 2) Create a docker compose file (docker-compose.yml) with following configuration
version: '3'
services:
  db2server:
    container_name: db2server
    image: ibmcom/db2
    environment:
      - LICENSE=accept
      - DB2INST1_PASSWORD=test
      - DBNAME=testdb
    ports:
      - '50000:50000'
    privileged: trueCode language: Java (java)
Step 3) Open command prompt and navigate to db2server folder run following command
docker-compose upCode language: Shell Session (shell)If you want to run in detached mode, you can run in the following command
docker-compose up -dCode language: Shell Session (shell)Above command will download the image ( for the first time) and start the database in container.
The database is started on localhost at 50000 port.
Persisting the Data
If you are looking for temp database, above configuration is fine but if you want data to persist so that it is available when ever we start the container then we need to create a volume and store the data in it.
Create folder called db2data inside db2server folder which stores the data
docker command with volume mapping.
docker run -d --name db2server --privileged=true -p 50000:50000 -e LICENSE=accept -e DB2INST1_PASSWORD=test -e DBNAME=testdb -v ./db2data:/database ibmcom/db2Code language: Shell Session (shell)docker-compose file with volume mapping ( create directory named oracle-volume where docker-compose is created)
version: '3'
services:
  db2server:
    container_name: db2server
    image: ibmcom/db2
    environment:
      - LICENSE=accept
      - DB2INST1_PASSWORD=test
      - DBNAME=testdb
      - PERSISTENT_HOME=false
    volumes:
      - './db2data:/database'
    ports:
      - '50000:50000'
    privileged: trueCode language: Java (java)
Trouble Shooting
A communication error occurred during operations on the connection's underlying socket, socket input stream,
or socket output stream.  Error location: Reply.fill() - insufficient data (-1).  Message: Insufficient data. ERRORCODE=-4499, SQLSTATE=08001Code language: Java (java)
DB2 database docker container use TCP port 22 to communicate. If docker container uses port < 1024,it should run in privileged mode.
docker command should run with –privileged=true option.
The instance home directory "/database/config/db2inst1" is invalid because it
is not owned by the user "db2inst1". Change the ownership of the home directory
to be owned by the instance user and its primary group.Code language: Java (java)
When running DB2 database in docker container on Windows OS, we should set PERSISTENT_HOME environment variable to false. By default it is set to true.
Advanced Configuration Options
DB2 Docker Container supports following environment variables that could be toggled to customize the deployment
- DB2INSTANCE (default: db2inst1) is to specify the Db2 Instance name
- DB2INST1_PASSWORD (default: auto generated 12 character) is to specify the respective Db2 Instance Password
- DBNAME creates an initial database with the name provided or leave empty if no database is needed
- BLU can be set to true to enable BLU Acceleration for instance
- ENABLE_ORACLE_COMPATIBILITY can be set to true to enable Oracle Compatibility on the instance
- SAMPLEDB can be set to true to create a sample (pre-populated) database
- PERSISTENT_HOME is true by default, only specify to false if you are running Docker for Windows.
- HADR_ENABLED if set to true, Db2 HADR will be configured. The following three env variables depend on HADR_ENABLED to be true
- ETCD_ENDPOINT is for specifying your own provided ETCD key-value store. Enter your endpoints with a comma as the delimiter and without a space. This env variable is needed if HADR_ENABLED is set to true
- ETCD_USERNAME specify the username credential for ETCD. If empty, it will use your Db2 instance
- ETCD_PASSWORD specify the password credential for ETCD. If empty, it will use your Db2 instance password
- TEXT_SEARCH (default: false) Specify true to enable and configure text search
- ARCHIVE_LOGS (default: true) Specify false to not configure log archiving (reduces start up time)
- AUTOCONFIG (default: true) Specify false to not run auto configuration on the instance and database (reduces start up time)
You can download docker-compose files from GitHub here
You might also interested in