Deploying Spring Boot Application on CapRover Using GitHub Actions
In this blog post, I will explain how we can deploy the Spring Boot application on CapRover using GitHub Actions.
In my previous blog post, I have shown how you can deploy Spring Boot application from GitHub repo automatically when ever we push the new code. In the deployment method we were building docker image in CapRover server, while the process is simple , it may not work on server with low amount of RAM as build process may require more RAM than available in the Server.
In this blog post, I will show how to deploy Spring Boot application on CapRover using GitHub Action, where we build the docker image and deploy the application.
We use the CapRover CLI deployment method from GitHub to deploy the application using GitHub Actions.
What is GitHub Actions
GitHub Actions is a continuous integration and continuous delivery (CI/CD) platform that allows you to automate your build, test, and deployment pipeline. You can create workflows that build and test every pull request to your repository, or deploy merged pull requests to production.
For deploying application using CapRove CLI method via GitHub Action, we need to prepare the environment.
Database SetUp
Let’s first setup “PostgreSQL” database server to store the data. We can setup PostgreSQL Database with Caprover one click app.
Please refer to the my previous blog post to setup database server and create database for the application.
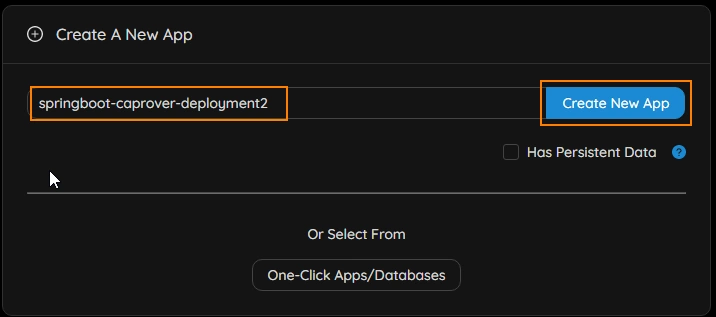
Creating Application
Log into CapRover server and create a new application.
To deploy the application from GitHub Actions, we need to login into the server. So instead of using the password we generate the app specific token which can be used as password to deploy the application.
Click on the application on dashboard and go to the “Deployment” section.
Go to the “Method 1: Official CLI” section and click on the “Enable App Token” button to generate token. Please note down the generated token.


Setting Environment Variables and PortMapping
We need to setup the environment variables in “App Config” section , so that application points to installed database.
SPRING_DATASOURCE_URL : jdbc:postgresql://srv-captain--postgres:5432/eisCode language: Java (java)Click on “Save & Update” button to save the configuration.
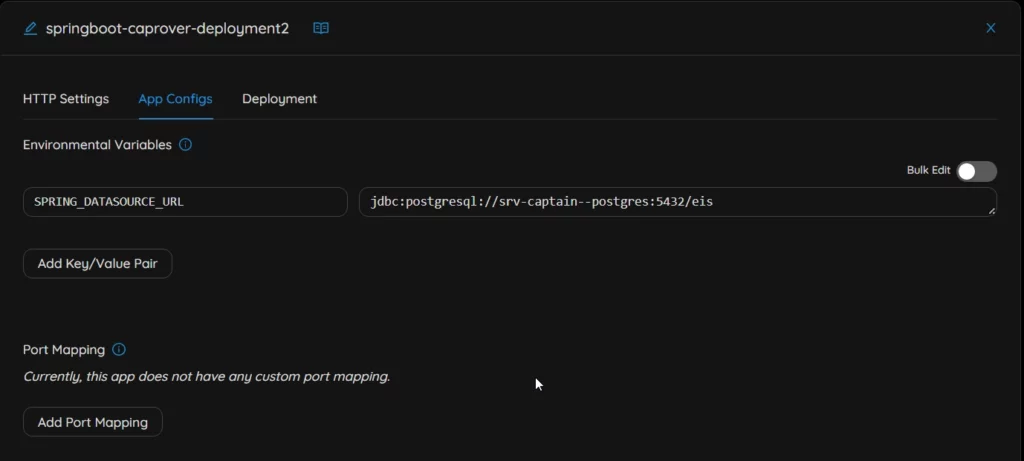
I have configured to application to run on port 80, so I am not configuring ports.
As the spring boot application runs on port 8080 , so you should map container port 8080 to container port of your choice.
Generating Docker Token
Using GitHub action we going to generate the docker image and push it to docker registry before deploying it on CapRover server. To push docker image into docker registry we need to login from GitHub action. To login into docker registry, we generate the docker token which acts as password.
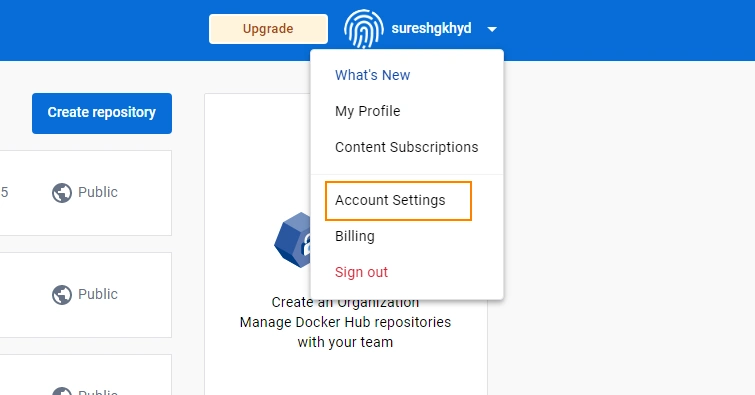
Log into hub.docker.com
Open your account settings by clicking on <user-name>/Account settings.
Click on “Security” link on the left side menu.
Generate new token by clicking on the “New Access Token” button
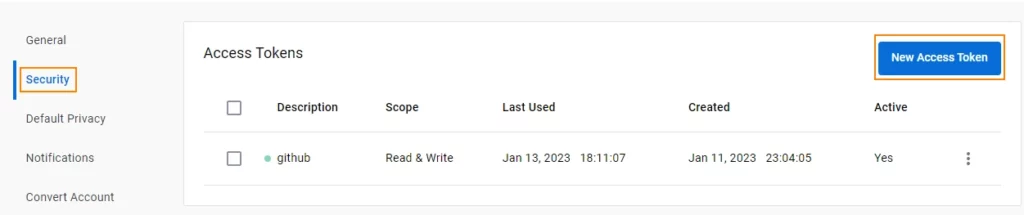
Note down the access token.
Creating GitHub Secrets
GitHub actions file is publicly accessible, so we can not store sensitive information in the actions file. Secrets are encrypted variables that we create in repository, or repository environment.
- On GitHub.com, navigate to the main page of the repository.
- Under repository name, click Settings.

3.In the “Security” section of the sidebar, select Secrets and variables, then click Actions.
4.Click the Secrets tab.
5.Click New repository secret.
6.Click New repository secret.
7.Type a name for your secret in the Name input box.
8.Enter the value for your secret
9.Click Add secret
We have to store all the sensitive information in secrets. We are going to create following secrets.
- DOCKER_TOKEN
- APP_TOKEN
- CAPROVER_SERVER
Creating Action Files
Next we create action file which contains the work flow steps.
Create .github/workflows directory in root of your projects.
inside workflows folder create “deployment.yml” file and place following code.
name: Deploy APP

env:
  IMAGE_NAME: sureshgkhyd/springboot-caprover-deployment2
  DOCKERFILE: Dockerfile.caprover
  CAPROVER_APP: springboot-caprover-deployment2
  DOCKER_REGISTRY: docker.io

on:
  push:
    branches: [ "master" ]
  pull_request:
    branches: [ "master" ]

jobs:
  publish-app:
    runs-on: ubuntu-latest
    steps:
      - uses: actions/checkout@v3
      - run: |
          echo "IMAGE_NAME_WITH_REGISTRY=$DOCKER_REGISTRY/$IMAGE_NAME" >> $GITHUB_ENV
          export IMAGE_NAME_WITH_REGISTRY=$DOCKER_REGISTRY/$IMAGE_NAME
          echo "FULL_IMAGE_NAME=$IMAGE_NAME_WITH_REGISTRY:$GITHUB_SHA-gitsha" >> $GITHUB_ENV
      - name: Login to Docker Hub
        uses:  docker/login-action@v2
        with:
          username: ${{ secrets.DOCKER_USERNAME }}
          password: ${{ secrets.DOCKER_TOKEN }}
      - name: Setup Docker buildx
        uses: docker/setup-buildx-action@v2
      - name: Build and Push Release to DockerHub
        shell: bash
        run: ./build_and_push.sh
      - name: Deploy to CapRover
        uses: caprover/deploy-from-github@d76580d79952f6841c453bb3ed37ef452b19752c
        with:
          server: "${{ secrets.CAPROVER_SERVER }}"
          app: ${{ env.CAPROVER_APP }}
          token: "${{ secrets.APP_TOKEN }}"
          image: "${{ env.FULL_IMAGE_NAME }}"Code language: Java (java)
Here is explanation of each action
- uses: actions/checkout@v3Code language: Java (java)It checks out the application code
uses: docker/login-action@v2Code language: Java (java)Log into docker registry to upload docker image.
uses: docker/setup-buildx-action@v2Code language: Java (java)Setup docker to use buildx command.
As my CapRover instance is deployed on ARM based computer, I am using docker buildx to create ARM based image for deployment.
If you have created CapRover instance on x86_64 based computer, you can omit this action.
uses: caprover/deploy-from-github@d76580d79952f6841c453bb3ed37ef452b19752cCode language: Java (java)Deploys the docker image to CapRover instance
I have created a script file which builds and pushes docker image to docker hub which is invoked as part GitHub action workflow.
build_and_push.sh
#!/bin/bash

# Exit early if any command fails
set -e
pwd

# ensure you're not running it on local machine
if [ -z "$CI" ] || [ -z "$GITHUB_REF" ]; then
    echo "Running on a local machine! Exiting!"
    exit 127
else
    echo "Running on CI"
fi

env
# dump all env vars in a temp file and pass it as build args
rm /tmp/build_args || echo OK
env > /tmp/build_args
echo "--build-arg \""`cat /tmp/build_args | sed -z 's/\n/" --build-arg "/g'`"IGNORE_VAR=IGNORE_VAR\"" >  /tmp/build_args

BUILD_ARGS=`cat /tmp/build_args`
COMMAND="docker buildx  build  --platform linux/amd64,linux/arm64 --push -t $FULL_IMAGE_NAME -t $IMAGE_NAME_WITH_REGISTRY:latest -f $DOCKERFILE $BUILD_ARGS --no-cache ."

echo "-------------------"
echo "-------------------"
echo $BUILD_ARGS
echo "-------------------"
echo $COMMAND
echo "-------------------"
echo "-------------------"

/bin/bash -c "$COMMAND"

rm /tmp/build_argsCode language: Java (java)
We need to set execution mode permission for the script file as we are using Ubuntu to run our GitHub actions.
In Linux
chmod +x build_andpush.shCode language: Java (java)In Windows
Open GitBash window and execute following command.
git update-index --chmod=+xCode language: Java (java)Following is the Docker file which is referenced in script file
Dockerfile.caprover
FROM adoptopenjdk/openjdk11:jdk-11.0.16.1_1-slim as build
COPY mvnw ./
COPY .mvn .mvn
COPY pom.xml ./
COPY src src
RUN chmod a+rx mvnw
RUN ./mvnw clean package -DskipTests

FROM adoptopenjdk/openjdk11:jdk-11.0.16.1_1-slim
COPY --from=build "./target/*.jar" /app.jar
RUN addgroup --system springboot && adduser --system sbuser && adduser sbuser springboot
USER sbuser
ENTRYPOINT ["java", "-jar", "/app.jar"]Code language: Java (java)
When you push new code to master branch, GitHub will automatically trigger the workflow from actions and build and deploy the application.
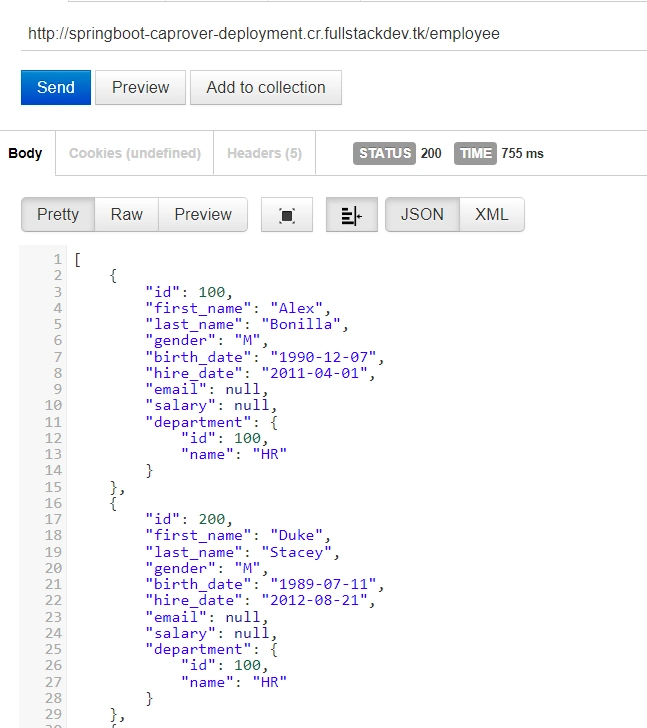
Testing the application.
Now we can test our application with rest client.
You might be also interested in
References
https://github.com/marketplace/actions/deploy-github-repo-to-caprover