Setup Your Own PaaS with CapRover on Oracle Cloud Ampere A1 instance.
In this blog post, I will show the step by step process to install CapRover on Oracle Cloud Server.
What is CapRover?
Caprover is a Platform-as-a-Service (PaaS) solution that provides developers with the ability to easily deploy their applications. It makes it much simpler to deploy and manage web applications, as the platform takes care of all the heavy lifting. With Caprover, users can spin up their own servers with just a few clicks and quickly get their application running in no time. Additionally, Caprover also offers a variety of services such as database management, auto-scaling and automated backups for optimal performance and reliability.
It offers a wide range of features, from one-click deployments to full-scale managed services. Caprover’s intuitive user interface makes it simple for developers to get their applications running.
Caprover is ideal for businesses looking to securely deploy their applications without the cost and complexity of traditional cloud hosting solutions.
CapRover Features
- Deploy apps of any language which can be packaged as Docker image.
- Secure your services over HTTPS for FREE and ability to automatically redirect HTTP to HTTPS
- Availability of one click apps
- Multiple ways to deploy application including Git integration for CI/CD
- Can attach more nodes and create a cluster
Prerequisites
- Domain Name
During installation, you’ll be asked to point a wildcard DNS entry to your CapRover IP Address. You can get free domain from freenom for one year
Note : CapRover can run without a domain too. But you won’t be able to setup HTTPS
- Oracle Cloud Free tier Account
In standard installation, CapRover has to be installed on a machine with a public IP address.
We are going to use server from Oracle Cloud free tier account. As CapRover supports AMD64 (X86), ARM64, and ARMV7 CPUs architectures we can use either AMD (x86) instance or Ampere A1 instance (ARM64).
In this blog post I am going to use the Ampere A1 processor based instance to deploy CapRover.
If you want to install CapRover on AMD64(x86_64) based instance, only the installation command changes and everything remains same.
Note
CapRover comes with lot of one click application which can be deployed easily .If you use ARM64 based processors lot of those application does not work.
If you are looking for on-click app compatibility, It is better to install CapRover on AMD64(x86_64) instance. On Oracle Cloud, free tier account comes with free AMD based instances but it has access to only 1GB of RAM, so you will not be able to install lot of applications.
Create Ampere A1 based Compute Instance
Log into your Oracle cloud account and Create compute instance with following resources.
- Processor : Ampere A1( 1 core)
- RAM : 4 GB
- OS : Ubuntu 22.04
- Storage : 50 GB
Download the SSH keys so that we can connect to the instance.
You can follow the step by step process from my previous blog post
Note: CapRover minimum requirement for RAM is only 512 MB, but you should provide at least 1 GB of RAM while creating compute instance. Depending your application needs you need to provision the extra RAM, storage and CPU cores
Opening the Ports
Connect server instance using SSH key
ssh -i <private-key-path> ubuntu@<public-ip>Code language: Java (java)Open the firewall ports on the server to allow the traffic
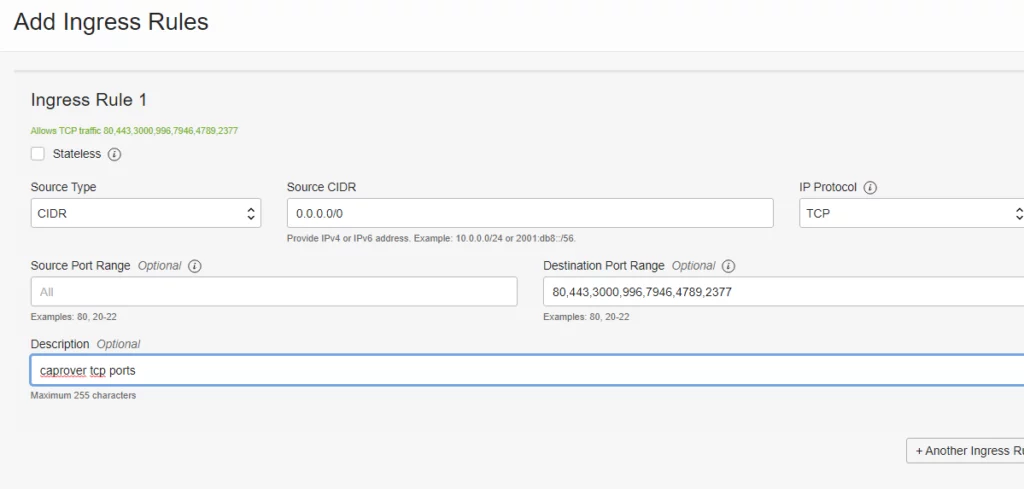
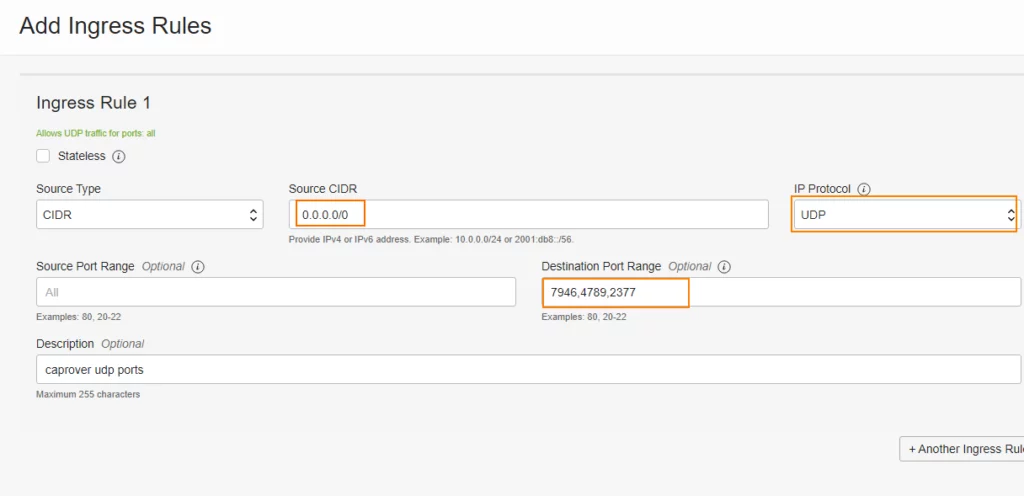
sudo ufw allow 80,443,3000,996,7946,4789,2377/tcp;Code language: Java (java)sudo ufw allow 7946,4789,2377/udp;Code language: Java (java)For above ports add Ingress Rules to allow traffic on the ports in Virtual Network Interface Card ( VNIC) attached to the compute instance in Oracle cloud.
You can follow the step by step process from my previous blog post
Notice Title
Please make sure that you select right protocol for ports.first set ports requires TCP protocol and second set requires UDP protocol.
Install Docker
Caprover runs based on docker. We need to install the docker on the server.
Before you install Docker Engine for the first time on a new host machine, we need to set up the Docker repository. Afterward, you can install and update Docker from the repository.
sudo apt updateCode language: Java (java)sudo apt install \
ca-certificates \
curl \
gnupg \
lsb-releaseCode language: Java (java)sudo mkdir -p /etc/apt/keyrings
Code language: Java (java)curl -fsSL https://download.docker.com/linux/ubuntu/gpg | sudo gpg --dearmor -o /etc/apt/keyrings/docker.gpgCode language: Java (java)echo \
"deb [arch=$(dpkg --print-architecture) signed-by=/etc/apt/keyrings/docker.gpg] https://download.docker.com/linux/ubuntu \
$(lsb_release -cs) stable" | sudo tee /etc/apt/sources.list.d/docker.list > /dev/nullCode language: Java (java)Grant read permission for the Docker public key file before updating the package
sudo chmod a+r /etc/apt/keyrings/docker.gpg

sudo apt-get updateCode language: Java (java)
Install Docker Engine
To install the latest version, run following command
sudo apt install docker-ce docker-ce-cli containerd.io docker-compose-pluginCode language: Java (java)The Docker daemon always runs as the root user . other users can access only access it using “sudo”
If you don’t want to preface the docker command with sudo, create a Unix group called docker and add users to it. When the Docker daemon starts, it creates a Unix socket accessible by members of the docker group.
Create docker group
sudo groupadd dockerCode language: Java (java)Add your user to the docker group.
sudo usermod -aG docker $USERCode language: Java (java)You can run the following command to activate the changes to groups
newgrp dockerCode language: Java (java)You can also Log out and log back in so that your group membership is re-evaluated.
Verify that you can run docker commands without sudo.
docker run hello-worldCode language: Java (java)Installing Docker compose
sudo curl -L "https://github.com/docker/compose/releases/download/v2.14.0/docker-compose-$(uname -s)-$(uname -m)" -o /usr/local/bin/docker-compose
Code language: Java (java)
Apply executable permissions to docker-compose binary
sudo chmod +x /usr/local/bin/docker-composeCode language: Java (java)Test with by running
docker-compose --helpCode language: Java (java)Starting the docker service on system startup
sudo systemctl enable docker.service
sudo systemctl enable containerd.serviceCode language: Java (java)
CapRover Setup
CapRover Installation
Install CapRover on the server with following command.
docker run -p 80:80 -p 443:443 -p 3000:3000 \
        -e MAIN_NODE_IP_ADDRESS='<public-ip-of-server>' \
        -v /var/run/docker.sock:/var/run/docker.sock \
        -v /captain:/captain \
        caprover/caprover-edgeCode language: Java (java)
If you are installing CapRover on Intel or AMD based server you can use following command.
docker run -p 80:80 -p 443:443 -p 3000:3000 -e MAIN_NODE_IP_ADDRESS='<public-ip-of-server>' -v /var/run/docker.sock:/var/run/docker.sock -v /captain:/captain caprover/caprover
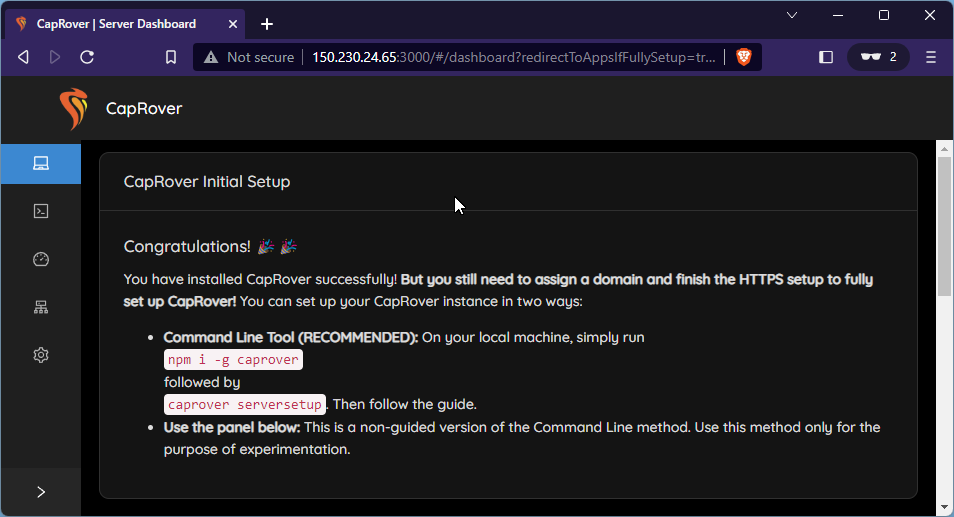
Code language: Java (java)Once the CapRover is initialized, you can visit http://[PUBLIC_IP_OF_YOUR_SERVER]:3000 in your browser and login to CapRover using the default password captain42. Do not change password now and do not make any changes in the dashboard. We’ll use the command line tool to setup the server.

Connect Root Domain
We will map CapRover server to sub domain of fullstackdev.tk.
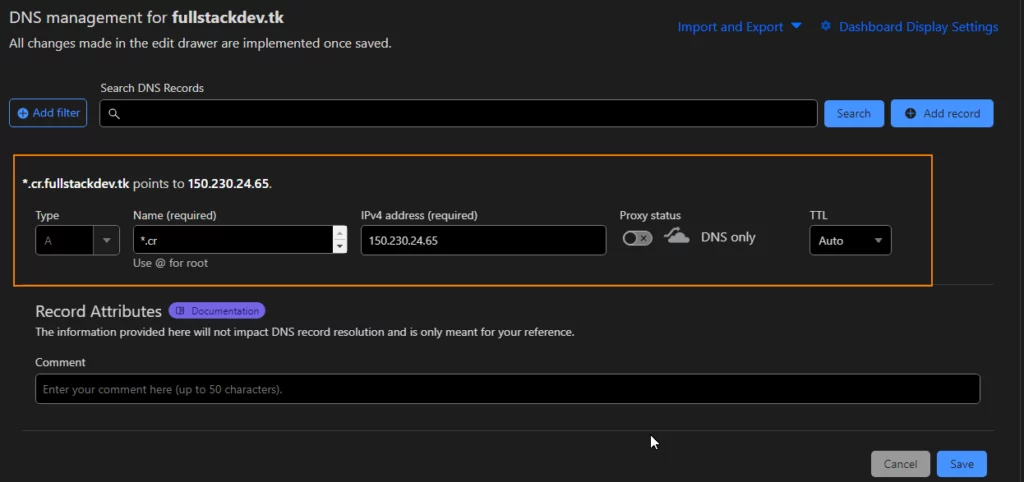
We need to set *.<something>.fullstackdev.tk as an A-record in DNS settings to point to the public IP address of the server where we installed CapRover.
I have added my domain in Cloudflare. We need to create A record in Cloudflare with following details
- TYPE: A record
- HOST:
*.cr - POINTS TO: (public IP Address of server)
Also make sure that proxy is not enabled for the record in Cloudflare.
Note
It might take some time to propagate the DNS entry.
Caprover server is only protected by password. So if you want extra security create domain as *.something1.something2 so it will be hard to guess actual CapRover domain for anybody.
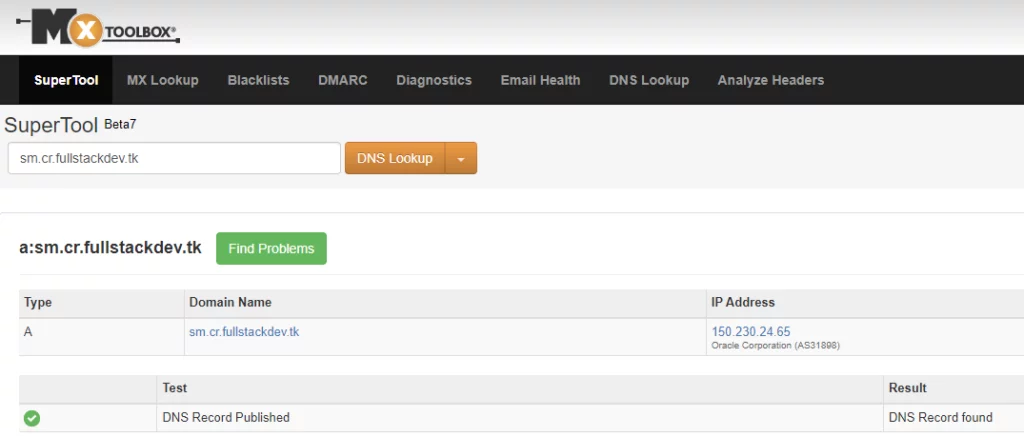
To confirm DNS propagation , go to https://mxtoolbox.com/DNSLookup.aspx and enter sm.cr.fullstackdev.tk and check if IP address resolves to the IP you set in your DNS (i.e CapRover Server public IP)
Install CapRover CLI
In your local system install CapRover with npm
npm install -g caproverCode language: Java (java)Now you can setup CapRover server with following command.
caprover serversetupCode language: Java (java)The setup will ask the following questions and provide the url to access the CapRover
Setup CapRover machine on your server...

? have you already started CapRover container on your server? Yes
? IP address of your server: <ip-address-of-server>
? CapRover server root domain: cr.fullstackdev.tk
? new CapRover password (min 8 characters): [hidden]
? enter new CapRover password again: [hidden]
? "valid" email address to get certificate and enable HTTPS: <email-address>
? CapRover machine name, with whom the login credentials are stored locally: captain-01
CapRover server setup completed: it is available as captain-01 at https://captain.cr.fullstackdev.tk

For more details and docs see CapRover.comCode language: Java (java)
If you navigate to https://captain.cr.fullstackdev.tk address in browser, you will see the login page of CapRover


Set up Swap file
If you have created CapRover server with limited amount of RAM, you might face problem when you are building the application. When building application docker image, if it requires more memory than available , the build will fail. To deal around these issues (without purchasing extra RAM), create we need to create a Swap file (which is used as virtual RAM).
Below commands create 4GB of swap file.
sudo fallocate -l 4G /swapfile
sudo chmod 600 /swapfile
sudo mkswap /swapfile
sudo swapon /swapfileCode language: Java (java)
To make the changes permanent open the /etc/fstab file
sudo nano /et/fstabCode language: Java (java)and paste the following lines
/swapfile swap swap defaults 0 0Code language: Java (java)You can verify the active swap by running following command
sudo swapon --showCode language: Java (java)In next blog post, I will show you how to deploy Spring Boot applications on CapRover.