Complete Guide to Spring Boot Validation
Spring Boot offers comprehensive support for Request validation using the Bean Validation specification. With Spring Boot, you can quickly add validation to your existing classes with minimal effort. We’ll also take a look at how we can use validation groups to invoke different validations in different use cases.
We will also show you how to use the validation starter to include validation in your project.
Validated requests for data make your life easier. You can be more confident that the data you are receiving is exactly what you expect it to be.
Spring Boot auto configures validation feature supported by Bean Validation as long as a JSR-303 implementation (such as Hibernate validator) is on the class path.
Built-in constraints
Hibernate Validator comes with a standard set of validators. The Jakarta Bean Validation standard defines the first set of validations. . Additionally, Hibernate Validator also provides useful custom constraints.
Jakarta Bean Validation constraints
| @AssertFalse,@AssertTrue | @Future | @NotBlank | @NegativeOrZero | @Pattern |
| @DecimalMax,@DecimalMax | @FutureOrPresent | @NotEmpty | @Null | @Positive |
| @Digits | @Max(value=) | @NotNull | @Past | @PositiveOrZero |
| @Min(value=) | @Negative | @PastOrPresent | @Size(min=, max=) |
Additional constraints
In addition to the constraints defined by the Jakarta Bean Validation API, Hibernate Validator provides
several useful custom constraints which are listed below
| @CreditCardNumber | @ISBN | @Mod11Check | @URL | @PESEL |
| @Currency | @Length(min=, max=) | @Normalized | @CNPJ | @REGON |
| @DurationMax | @CodePointLength | @Range | @CPF | @INN |
| @DurationMin | @LuhnCheck | @ScriptAssert | @TituloEleitoral | |
| @EAN | @Mod10Check | @UniqueElements | @NIP |
You can find more information about built-in validators from the official documentation
Add Dependency
We need to add following dependency to spring boot project to auto configure validation feature in Spring Boot application.
<dependency>
			<groupId>org.springframework.boot</groupId>
			<artifactId>spring-boot-starter-validation</artifactId>
		</dependency>
Note
In all Spring Boot versions below version 2.2, Validations starter is part of web starter project
@Valid Annotation
When Spring Boot finds a method argument annotated with @Valid,it automatically bootstraps the Hibernate Validators and validates the argument. When target argument fails to pass the validation, Spring Boot throws MethodArgumentNotValidException
Validating Requests in Spring Boot Applications
Validating Request Body
I am going to use the REST API developed in one of my previous post to showcase the spring boot validation feature.
Annotate method parameter with @Valid annotation in your controller class.
@RestController
@RequestMapping("/employee")
public class EmployeeController {

    @Autowired
    EmployeeService employeeService;


 ...
    @PostMapping
    public Employee createEmployee(@RequestBody @Valid Employee employee) {
        return employeeService.createEmployee(employee);
    }

    @PutMapping()
    public Employee updateEmployee(@RequestBody @Valid Employee employee) {
        return employeeService.updateEmployee(employee);
    }
   ...
}
Now write the validation annotations on the bean.
@Entity
public class Employee implements Serializable {

    @Id
    @GeneratedValue(strategy = GenerationType.AUTO)
    private Integer id;

    @NotBlank(message = "FirstName should not be blank")
    @Size(min = 3,message = "FirstName should be at least 3 chars")
    private String first_name;

    @NotBlank(message = "LastName should not be blank")
    @Size(min = 3,message = "LastName should be at least 3 chars")
    private String last_name;

    @Enumerated(EnumType.STRING)
    private Gender gender;

    @PastOrPresent
    private LocalDate birth_date;

    @PastOrPresent
    private LocalDate hire_date;

    @NotBlank
    @Email
    private String email;

    @PositiveOrZero
    private BigDecimal salary;

    @ManyToOne
    @JoinColumn(name = "department_id")
    private Department department;


    public Employee() {

    }
    public Integer getId() {
        return id;
    }

    public void setId(Integer id) {
        this.id = id;
    }

    public String getFirst_name() {
        return first_name;
    }

    public void setFirst_name(String first_name) {
        this.first_name = first_name;
    }

    public String getLast_name() {
        return last_name;
    }

    public void setLast_name(String last_name) {
        this.last_name = last_name;
    }

    public Gender getGender() {
        return gender;
    }

    public void setGender(Gender gender) {
        this.gender = gender;
    }

    public LocalDate getBirth_date() {
        return birth_date;
    }

    public void setBirth_date(LocalDate birth_date) {
        this.birth_date = birth_date;
    }

    public LocalDate getHire_date() {
        return hire_date;
    }

    public void setHire_date(LocalDate hire_date) {
        this.hire_date = hire_date;
    }

    public String getEmail() {
        return email;
    }

    public void setEmail(String email) {
        this.email = email;
    }

    public BigDecimal getSalary() {
        return salary;
    }

    public void setSalary(BigDecimal salary) {
        this.salary = salary;
    }

    public Department getDepartment() {
        return department;
    }

    public void setDepartment(Department department) {
        this.department = department;
    }


}
Now let’s test the validation by sending a invalid request.
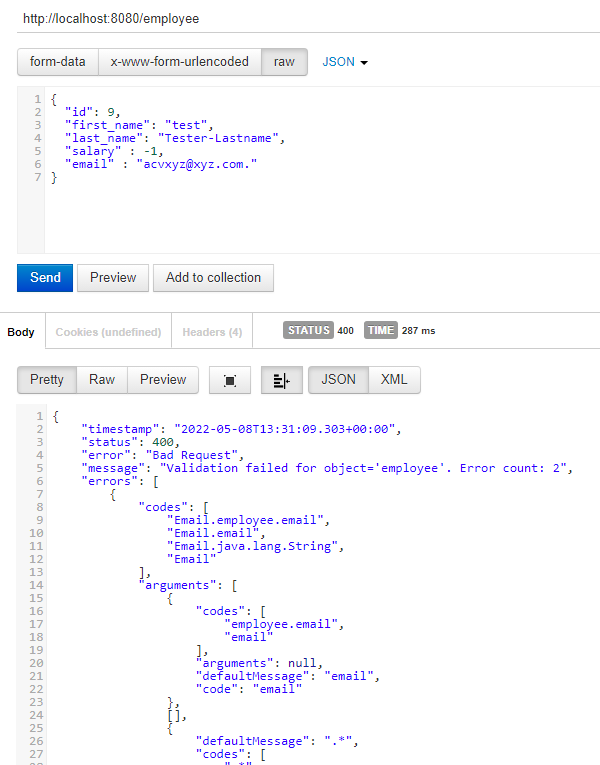
The complete response looks like below.
{
    "timestamp": "2022-05-08T13:31:09.303+00:00",
    "status": 400,
    "error": "Bad Request",
    "message": "Validation failed for object='employee'. Error count: 2",
    "errors": [
        {
            "codes": [
                "Email.employee.email",
                "Email.email",
                "Email.java.lang.String",
                "Email"
            ],
            "arguments": [
                {
                    "codes": [
                        "employee.email",
                        "email"
                    ],
                    "arguments": null,
                    "defaultMessage": "email",
                    "code": "email"
                },
                [],
                {
                    "defaultMessage": ".*",
                    "codes": [
                        ".*"
                    ],
                    "arguments": null
                }
            ],
            "defaultMessage": "must be a well-formed email address",
            "objectName": "employee",
            "field": "email",
            "rejectedValue": "acvxyz@xyz.com.",
            "bindingFailure": false,
            "code": "Email"
        },
        {
            "codes": [
                "PositiveOrZero.employee.salary",
                "PositiveOrZero.salary",
                "PositiveOrZero.java.math.BigDecimal",
                "PositiveOrZero"
            ],
            "arguments": [
                {
                    "codes": [
                        "employee.salary",
                        "salary"
                    ],
                    "arguments": null,
                    "defaultMessage": "salary",
                    "code": "salary"
                }
            ],
            "defaultMessage": "must be greater than or equal to 0",
            "objectName": "employee",
            "field": "salary",
            "rejectedValue": -1,
            "bindingFailure": false,
            "code": "PositiveOrZero"
        }
    ],
    "path": "/employee"
}
If we look at the above response it is very verbose. We can customize the response by handling the MethodArgumentNotValidException exception.
@ControllerAdvice
public class GlobalExceptionHandler extends ResponseEntityExceptionHandler {


    @ExceptionHandler(Exception.class)
    @ResponseBody
    public ErrorDetails handleExceptions(Exception ex, WebRequest request) {
        ErrorDetails errorDetails = new ErrorDetails(LocalDate.now(),ex.getMessage(), "Exception");
        return errorDetails;
    }

    @Override
    protected ResponseEntity<Object> handleMethodArgumentNotValid(MethodArgumentNotValidException ex, HttpHeaders headers, HttpStatus status, WebRequest request) {

        List<ErrorMessageDto> validationErrorDetails = ex.getBindingResult()
                .getFieldErrors()
                .stream()
                .map(error -> new ErrorMessageDto(error.getObjectName(),error.getField(),error.getDefaultMessage(),error.getRejectedValue().toString()))
                .collect(Collectors.toList());

        ErrorResponse response = new ErrorResponse(status.name(), status.value(),validationErrorDetails);
        return new ResponseEntity<>(response,status );

    }

}
Now the failed validation response looks like below
{
    "error": "BAD_REQUEST",
    "code": 400,
    "errors": [
        {
            "object": "employee",
            "message": "must be a well-formed email address",
            "rejectedValue": "acvxyz@xyz.com.",
            "fields": "email"
        },
        {
            "object": "employee",
            "message": "must be greater than or equal to 0",
            "rejectedValue": "-1",
            "fields": "salary"
        }
    ]
}
Validating Path and Query Params
Apart from method parameters, Spring Boot supports validating path variables and query parameters in the URL.
In this scenario, we’re not verifying complex Java objects because path variables and request arguments are simple types like int or their equivalent objects like Integer or String.
Instead of annotating a class field as in the previous example, we add a validation annotation directly to the method argument in the Spring controller
Whenever path variable, query parameter fails validation , framework throws ContraintViolationException
@Validated annotation
To validate path variables, first we need to annotate the controller class with @Validated annotation.
@Validated annotation can be used in the method level but in this scenario we are using at class level.
Next write validations on the path variables like below
@RestController
@RequestMapping("/employee")
@Validated
public class EmployeeController {

    @Autowired
    EmployeeService employeeService;

    @GetMapping()
    public List<Employee> getEmployees() {
        return employeeService.getAllEmployees();
    }


    @GetMapping("/{id}")
    public Employee getEmployee(@PathVariable @Min(1) Integer id) {
        return employeeService.getEmployeeById(id).orElseThrow(() ->new ResponseStatusException(HttpStatus.NOT_FOUND,"Employee not found with id : "+ id));
    }


    @ResponseStatus(HttpStatus.CREATED) // send HTTP 201 instead of 200 as new object created
    @PostMapping
    public Employee createEmployee(@RequestBody @Valid Employee employee) {
        return employeeService.createEmployee(employee);
    }

    @PutMapping()
    public Employee updateEmployee(@RequestBody @Valid Employee employee) {
        return employeeService.updateEmployee(employee);
    }

    @DeleteMapping(value="/{id}")
    public  void deleteEmployee(@PathVariable("id") @Min(1) Integer id){
        employeeService.deleteEmployee(id);
    }

    @PatchMapping("/{empId}/dept/{deptId}")
    public Employee updateEmpDepartment(@PathVariable("empId") @Min(1) Integer emp_id , @PathVariable("deptId") @Min(1) Integer dept_id) {
       return employeeService.updateEmpDepartment(emp_id,dept_id);
    }

    @PatchMapping("/{empId}")
    public Employee updateEmpDepartmentById(@PathVariable("empId") Integer emp_id , @RequestBody Department department) {
        return employeeService.updateEmpDepartment(emp_id,department.getId());
    }

    @GetMapping(value="/gender/{gender}")
    public List<Employee> getEmployeesByGender(@PathVariable String gender) {

        return employeeService.findEmployeesByGender(Gender.valueOf(gender));
    }


}
Let’s test the path variable validation
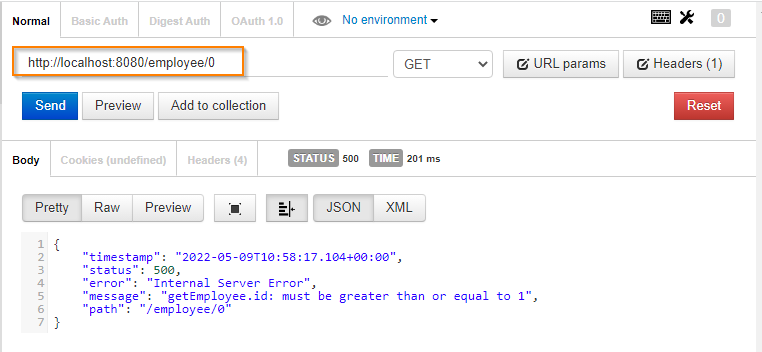
If we look at logs, framework throws ConstraintViolationException since it not handled it throws Internal Server Error to client.
2022-05-09 22:58:17.088 ERROR 24196 --- [nio-8080-exec-1] o.a.c.c.C.[.[.[/].[dispatcherServlet]    : Servlet.service() for servlet [dispatcherServlet] in context with path [] threw exception [Request processing failed; nested exception is javax.validation.ConstraintViolationException: getEmployee.id: must be greater than or equal to 1] with root cause

javax.validation.ConstraintViolationException: getEmployee.id: must be greater than or equal to 1
	at org.springframework.validation.beanvalidation.MethodValidationInterceptor.invoke(MethodValidationInterceptor.java:120) ~[spring-context-5.3.19.jar:5.3.19]
	at org.springframework.aop.framework.ReflectiveMethodInvocation.proceed(ReflectiveMethodInvocation.java:186) ~[spring-aop-5.3.19.jar:5.3.19]
	at org.springframework.aop.framework.CglibAopProxy$CglibMethodInvocation.proceed(CglibAopProxy.java:763) ~[spring-aop-5.3.19.jar:5.3.19]
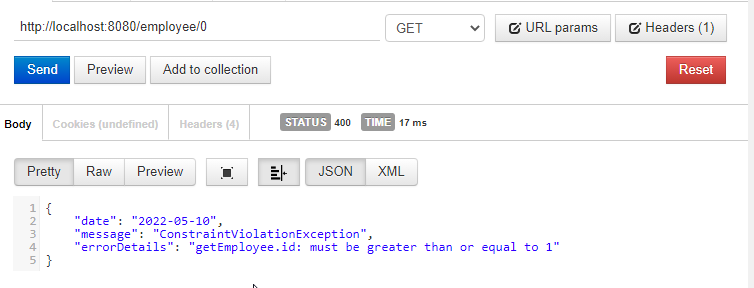
Instead of sending the InternalServerError to the client, we can customize the exception message by handling the ConstraintViolationException
@ControllerAdvice
public class GlobalExceptionHandler extends ResponseEntityExceptionHandler {

   ....

    @ExceptionHandler(ConstraintViolationException.class)
    @ResponseBody
    public ResponseEntity<Object> handleConstraintViolationException(Exception ex,  WebRequest request) {

        ErrorDetails errorDetails = new ErrorDetails(LocalDate.now(),"ConstraintViolationException", ex.getMessage());
        return new ResponseEntity<>(errorDetails, HttpStatus.BAD_REQUEST);
    }


}
Validation Groups to Validate Objects Differently for Different Use Cases
While working with CRUD operations, create and update operations take same object as input but id should be null while creating while updating id should not be null. In complex projects classes are shared between different use cases and those use cases my require different validations. So we need a mechanism to differentiate different use cases.
Bean validations have feature called “Validation Groups” which allows us to invoke different validations for different use cases.
@Validated Annotation
We can use the @Validated annotation to invoke validation groups. This annotation can be used on method and method parameter.
All validation annotations takes groups as one of the parameter where you can specify the group name they belong to.
Note
If we do not specify the group name for validations , they belongs group called Default group. Default group validations are invoked in all usecases.
If we look at the source code for @Null annotations we can see that it will take groups as one of the parameter.
public @interface Null {

	String message() default "{javax.validation.constraints.Null.message}";

	Class<?>[] groups() default { };

	Class<? extends Payload>[] payload() default { };

	....
}
First we will create marker interfaces which will represent the validation groups.
public interface OnCreate {

}
public interface OnUpdate {
}Next we will specify the groups in corresponding validations
@Entity
public class Employee implements Serializable {

    @Id
    @GeneratedValue(strategy = GenerationType.AUTO)
    @Null(groups = OnCreate.class)
    @NotNull(groups = OnUpdate.class)
    private Integer id;

    @NotBlank(message = "FirstName should not be blank")
    @Size(min = 3,message = "FirstName should be at least 3 chars")
    private String first_name;

    @NotBlank(message = "LastName should not be blank")
    @Size(min = 3,message = "LastName should be at least 3 chars")
    private String last_name;

    @Enumerated(EnumType.STRING)
    private Gender gender;

    @PastOrPresent
    private LocalDate birth_date;

    @PastOrPresent
    private LocalDate hire_date;

    @NotBlank // (message = "Email should not be blank")
    @Email    // (message = "Not a valid email")
    private String email;

    @PositiveOrZero
    private BigDecimal salary;

    @ManyToOne
    @JoinColumn(name = "department_id")
    private Department department;


      .........
}
Next we annotate method with @Validated annotation and specify the groups which needs to be invoked
Using @Validated annotation on method
@PostMapping
@Validated(OnCreate.class)
public Employee createEmployee(@RequestBody @Valid Employee employee) {
return employeeService.createEmployee(employee);
}
@PutMapping()
@Validated(OnUpdate.class)
public Employee updateEmployee(@RequestBody @Valid Employee employee) {
return employeeService.updateEmployee(employee);
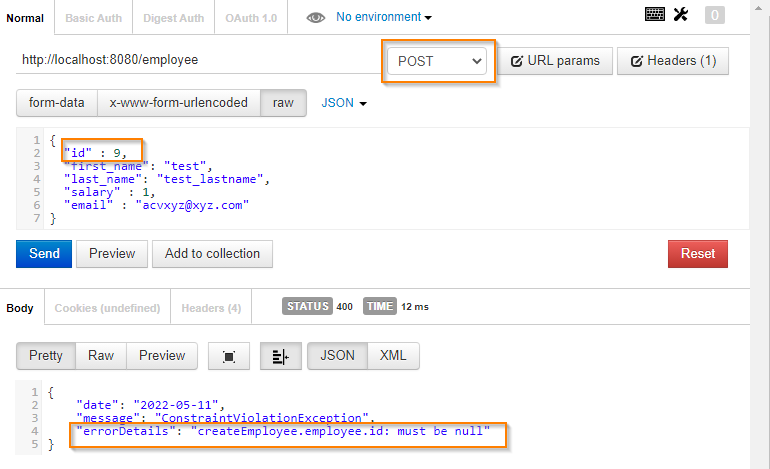
}Now lets test the validation groups.
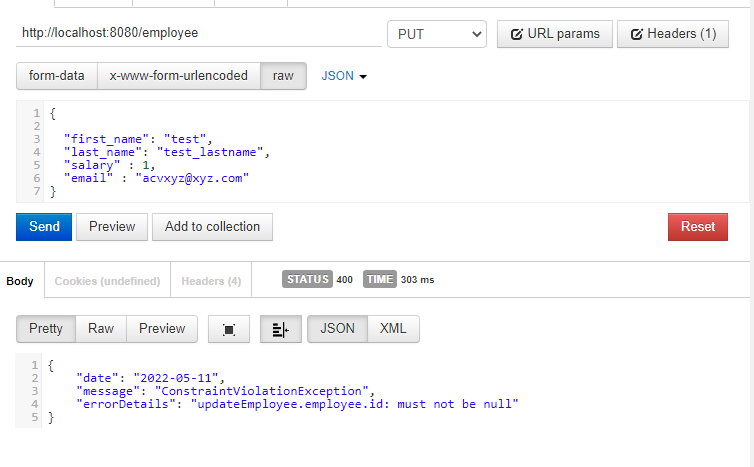
First let’s test the employee creation by providing id in the request
First let’s test the employee updating by not providing id in the request
Using @Validated annotation on method parameter
In previous example, we have used @Validated annotation on method. We can also use this annotation directly on the method parameter. When using @Validated on method parameter with group also need to specify the Default group.
@PutMapping()
public Employee updateEmployee(@RequestBody @Validated({OnUpdate.class, Default.class}) Employee employee) {
return employeeService.updateEmployee(employee);
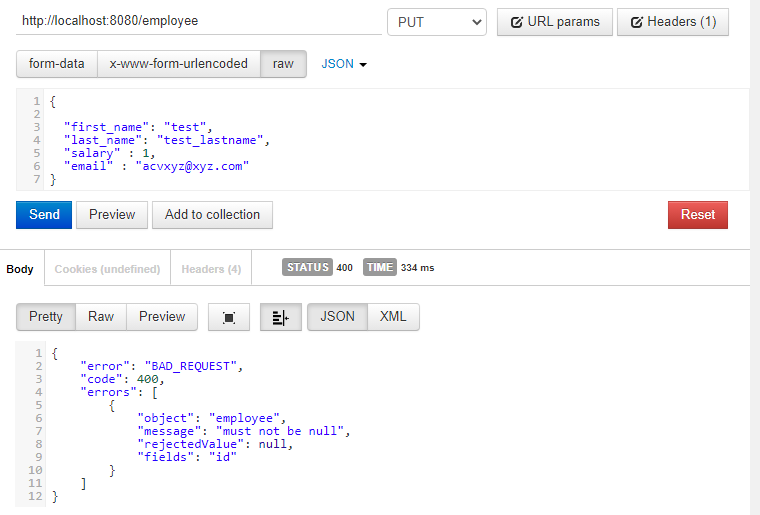
}If we test update function with above change we receive error message like below
What is the difference
When we use the @Validated annotation on the method, Spring Boot first validates the request based on the Default ( i.e validations with out any groups) group validations. If the default group validation passes then it will invoke the group related validations. If Default validation fails, the response will show only validation error messages related to them and it will not invoke the group related validations.
If group validation fails, framework will throw ContraintViolationException.
When we use the @Validated annotation on the method parameter , framework will invoke related group and default group validations and if validation fails it will throws MethodArgumentNotValidException.
Validating Programmatically
Instead of depending on Spring’s built-in Bean Validation functionality, there may be times when you want to invoke validations programmatically. We can achieve that 2 ways.
Using Pre-Configured Validator
Spring Boot provides pre configured validator instance. We can autowire this instance into our controller class and use this instance to invoke validators.
@RestController
@RequestMapping("/department")
public class DepartmentController {

    @Autowired
    DepartmentService departmentService;

    @Autowired
    private Validator validator;
    ...

    @PostMapping
    public Department createDepartment(@RequestBody Department department) {
        Set<ConstraintViolation<Department>> violations = validator.validate(department);
        if(!violations.isEmpty()) {
            throw  new ConstraintViolationException(violations);
        }
        return departmentService.createDepartment(department);
    }
.....
}
Using Validator API
We can instantiate validator using factory function and use to it to invoke validations.This approach can be used in non spring environments.
@RestController
@RequestMapping("/department")
public class DepartmentController {

    @Autowired
    DepartmentService departmentService;

    @PutMapping
    public Department updateDepartment(@RequestBody Department department) {
        Validator validator = Validation.buildDefaultValidatorFactory().getValidator();
        Set<ConstraintViolation<Department>> violations = validator.validate(department);
        if(!violations.isEmpty()) {
            throw  new ConstraintViolationException(violations);
        }
        return departmentService.updateDepartment(department);
    }
}
If want to invoke only validations related group you can pass the group name to validate function.
validator.validate(department, OnCreate.class)
Interpolating constraint error messages
Message interpolation is the process of creating error messages for violated Bean Validation constraints. In this section you will learn how such messages are defined and resolved and how you can plug in custom message interpolators in case the default algorithm is not sufficient for your requirements.
Default message interpolation
Spring Boot validation returns default error messages ( gets from hibernate validator framework) when validation fails.
For example
public class Employee implements Serializable {
...
@NotBlank(message = "FirstName should not be blank")
@Size(min = 3,message = "FirstName should be at least 3 chars")
private String first_name;
...
@PastOrPresent
private LocalDate birth_date;
...
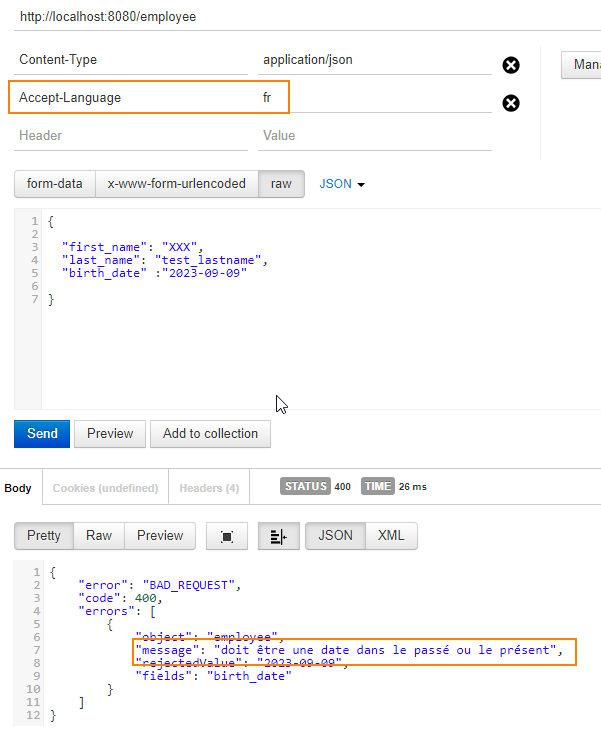
}If validation fails for birthdate – application will show the default in built error message
{
            "object": "employee",
            "message": "must be a date in the past or in the present",
            "rejectedValue": "2023-09-09",
            "fields": "birth_date"
        }
Overriding default error message
Spring Boot allows overriding default error messages by specifying error message with message attribute
If Size validation fails for first_name field- application will show the error message specified with message attribute
{
            "object": "employee",
            "message": "FirstName should be at least 3 chars",
            "rejectedValue": "te",
            "fields": "first_name"
        }
Interpolation with message expressions
it is possible to use the Unified Expression Language (as defined by JSR 341) in constraint violation messages. This allows to define error messages based on conditional logic and also enables advanced formatting options. The validation engine makes the following objects available in the EL context:
- the attribute values of the constraint mapped to the attribute names
- the currently validated value (property, bean, method parameter etc.) under the name
validatedValue - a bean mapped to the name
formatterexposing the var-arg methodformat(String format, Object... args)which behaves likejava.util.Formatter.format(String format, Object... args).
The following section provides several examples for using EL expressions in error messages.
Example 1
 @Size(min = 3,message = "FirstName should be at least {min} chars")
    private String first_name;
In above example ${min} resolves to value 3
Example 2
@Size(min = 3, max=10 , message = "FirstName should be between {min}  and {max} chars")
    private String first_name;
In above example ${min} resolves to value 3 and ${max} resolves to value 10.
Example 3
you can also include the value of attribute being validated in the error message with ${validatedValue} expression
@Size(min = 3, max=10 , message = "FirstName - ${validatedValue} should be between {min}  and {max} chars")
    private String first_name;
If bean validation fails for first name , error message will include the first name value in error message
“errors”: [
{
“object”: “employee”,
“message”: “FirstName – XX should be between 3 and 10 chars”,
“rejectedValue”: “XX”,
“fields”: “first_name”
}
Example 4
 @Min(
            value = 2,
            message = "There must be at least {value} seat${value > 1 ? 's' : ''}"
    )
    private int seatCount;
The @Min constraint on seatCount demonstrates how use an EL expression with a ternery expression to dynamically chose singular or plural form, depending on an attribute of the constraint (“There must be at least 1 seat” vs. “There must be at least 2 seats”)
Example 5
 @DecimalMax(
            value = "350",
            message = "The top speed ${formatter.format('%1$.2f', validatedValue)} is higher " +
                    "than {value}"
    )
    private double topSpeed;
the message for the @DecimalMax constraint on topSpeed shows how to format the validated value using the formatter object
Externalizing the error messages
Instead of specifying the error message string directly in the class, you can externalize the error messages.
To externalize the validation error messages
First you need to create file named ValidationMessages.properties in resources folder.
Now put key and error message in the property file
validation.firstNameSize=FirstName should be at least 3 chars
Now refer the error message in the message attribute like blow
@NotBlank(message = "FirstName should not be blank")
    @Size(min = 3, message = "{validation.firstNameSize}")

    private String first_name;
Support for i18n
the validation framework supports internationalization of error messages based on Accept-Language header.
Default error messages are supported in various languages.
Foe example, if you send Accept-Language header as fr (French) you will see the error message in french.
If you have custom error messages defined in ValidationMessages.properties file and want to support i18n
you have to create properties file for each locale in below format.
ValidationMessages_XX.properties –> XX should be replaced by locale
The validations discussed in this blog post are in built validations. In cases where these built-in constraints are not sufficient, you can easily create custom constraints tailored to your specific validation requirements. The custom validations can be applied at field or class level where validation depends on multiple fields. I will cover them in next post.
You can download source code from GitHub
You might be also interested in